-
Auto-allocate Project Managers

This option is usually set to Yes.
When a Project is created from the PMO menu this option will automatically allocate the Project to the PM so the Project shows in the Resources > Planning > Scheduling tab - even when the Project status is Draft.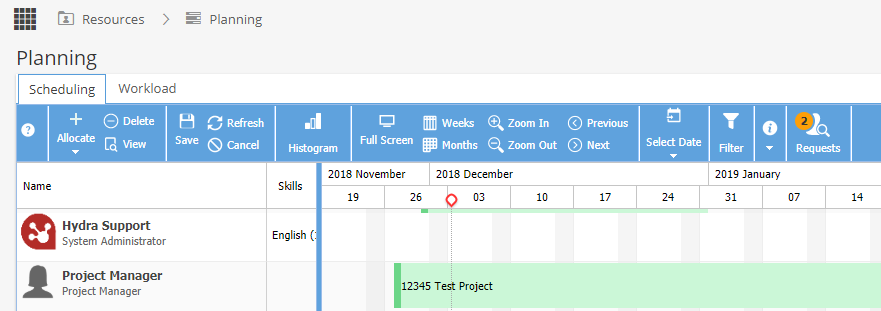
With this option set to yes, if a Project Manager is updated, the allocation will automatically be moved to the current PM. -
Tags Management
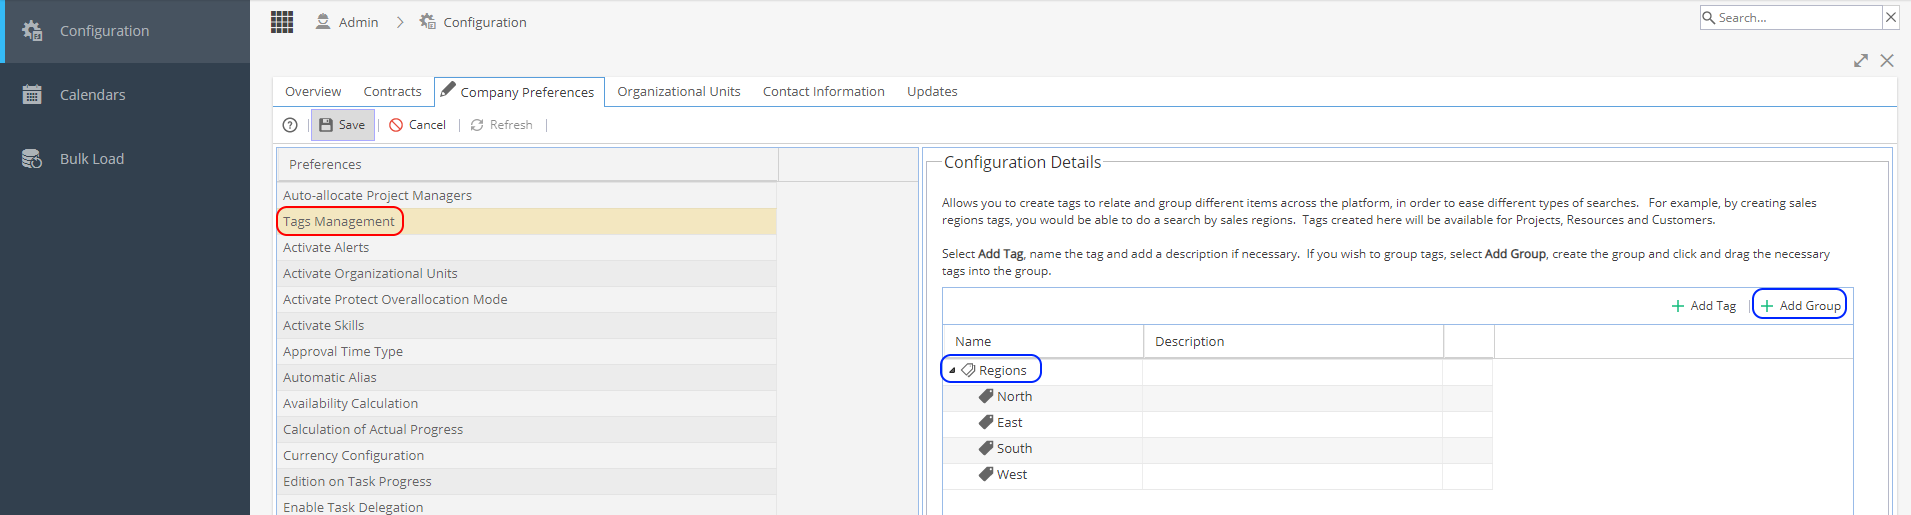
Tags can be set up in Groups, the Groups do not have to be related (for example you could have Region and Industry).
As Tags are an optional field you can select none, one or a combination.
Use the arrow to the left of a Group (shown with the white tags logo) to expand / minimise the group of Tags.Tags and Groups will not automatically go into alphabetical order, you will need to click and drag to order the lists the way you want them to show.
When you select a row you can:
- Add a description
- Use the green + to add a Tag to the selected Group
- Use the red icon to delete a Tag / Group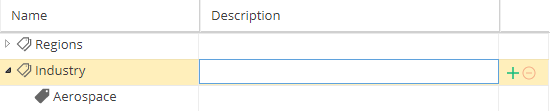
When you create a Tag using+ Add Tag it will not belong to a Group.
To add a Tag to a Group, click and drag until a green tick shows on the Group Name: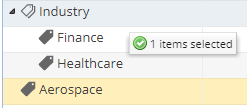
Now the grey tag will be indented so you know it belongs to the Group: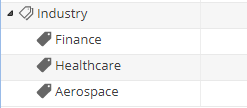
Tags can be used on Company Blueprints, Projects and Customers and Non-Project Tasks to give additional information.
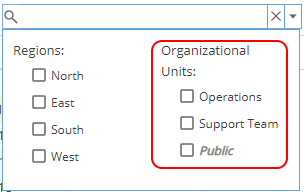
When you see a Quick Search box, select the down arrow on the right hand side to see Tags to filter your view by: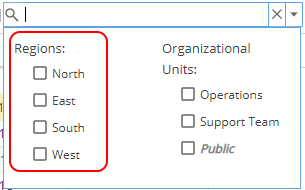
Note: Some places in the system use Project Tags
These are set up under Project > Admin > Preferences
To read more about Tags, click here -
Activate Alerts decides if you have the Alerts option shown in the PMO menu.

Alerts can let you know if Tasks are being deleted, Approvals are being skipped, Project progress deviation is too high or if the Project schedule has been modified multiple times.
If Alerts are enabled / disabled from this screen, you will need to log back into the system to see the update applied.
Remember once enabled, Alerts will need to be configured so you only see what you want to keep track of.
Once configured, Alerts can be viewed from the PMO > Alerts section or Project > Project Home > Alerts List TabAlerts can be used with a company dashboard report widget called "Alerts", which can track how many alerts are being counted per month, per Project or against each Project Manager, for example.
-
Activate Organizational Units decides if you want your company to use Organizational Units.
The main purpose of Org Units is to restrict access to information, any user who is not part of the org unit will not be able to see Projects, Customers, Resources or Blueprints.
If Organizational Units are activated / disabled from this screen, you will need to log back into the system to see the update applied.
Remember once enabled,Organizational Units will need to be configured.
Once org units have been set up, whenever you see a Quick Search box, you will be able to select the down arrow on the right hand side and filter by Organizational Unit:
-
Protect Overallocation Mode can be switched on or off for the Company.
You can set the number of weeks in the future you want overallocation to be flagged up for (1 - 8 weeks)
Set if you want to include or exclude Projects, Non Project Tasks and or Admin Times.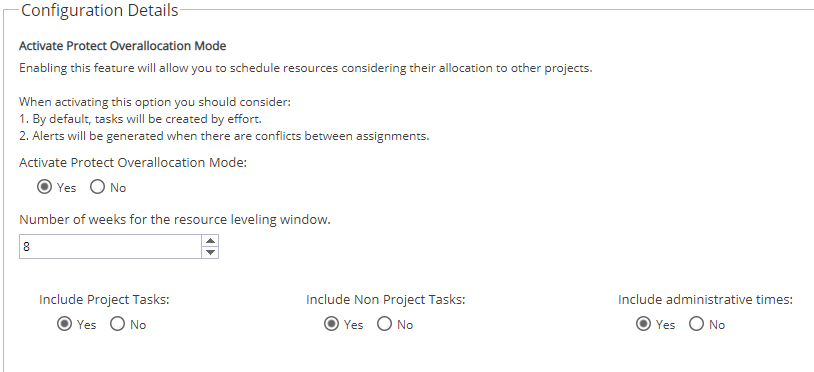
Overallocation will not apply to the current date, only from tomorrow onwards, up to the number of weeks set.
Protect overallocation prevents you from over-allocating resources by pushing tasks out to the next date available the resource can complete the work.
For example - A task is scheduled for 26/06/2019 but it is not assigned to a resource yet: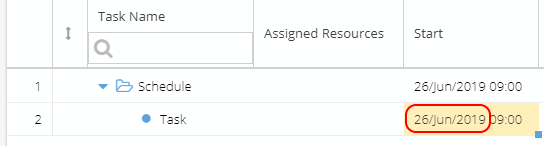
Once a Resource is assigned (and saved) the start date has changed: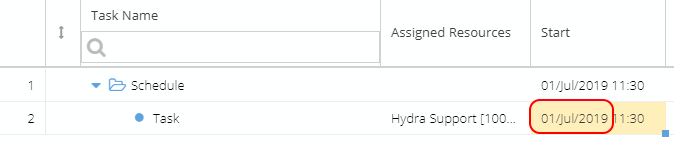
This is because the Resource already has a Task assigned from 24th June - 1st July.
The Resource next has availability to start the Task on the 1st July but it will run over to the 2nd July.
If Hydra finds there is a conflict caused by overallocation the Project will display a warning in the Gantt.
This could happen if a Task was scheduled but Admin Time has now been added (e.g. for Company Training or Annual Leave) so the Resource is no longer available
or if a conflict existed for Tasks booked in the future but they are now picked up within the overallocation window.
Clicking on the warning triangle will give further details: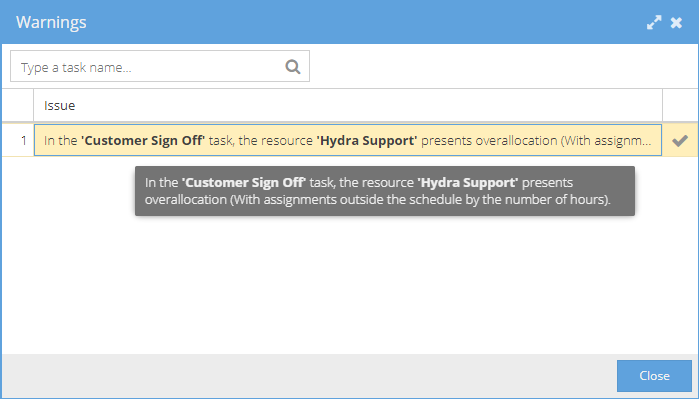
The PM can resolve the warning by changing the Task Dates or the Resource assigned.
The PM may also receive a warning to let them know if time has been freed up which allows them to start the Task earlier: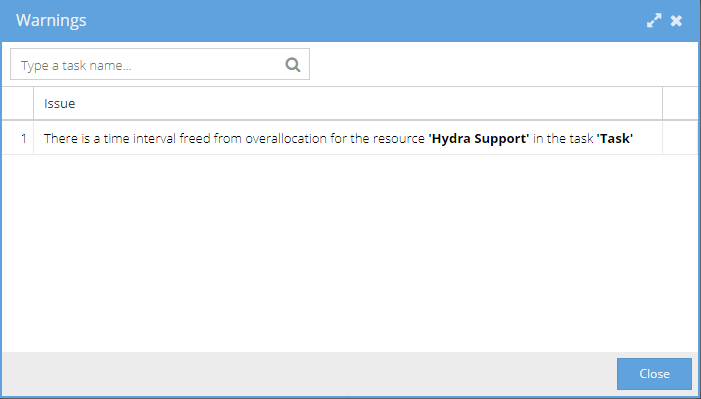
-
Activate Skills decides if you have the Skills option shown in the Resources menu.
Skills help you pick the right person for the right job, as an example you may be working with Projects / Customers that span different countries so you want to easily be able to pick Resources with the right language skills to meet your needs but any type of skill or experience can be created.

Skills can be configured via Resources > Skills
Within Blueprints > Assets > Tasks, when a Task is selected you can click on the Configure tab and specify a Skill needed for this Task.
When looking at the Project > Schedule > Gantt Chart > Resource Manager, you will also be able to see Skills from this view.
Skills can also be added to a task via Project > Tasks > Task Detail > Overview -
Activity Reports Template
This is a free text field used as a template for additional information to show on Page 2 of the PDF view of the My Space > My Timesheets > Activity Report
For example, you could use this to create a signature box for the timesheet to be signed off by a client.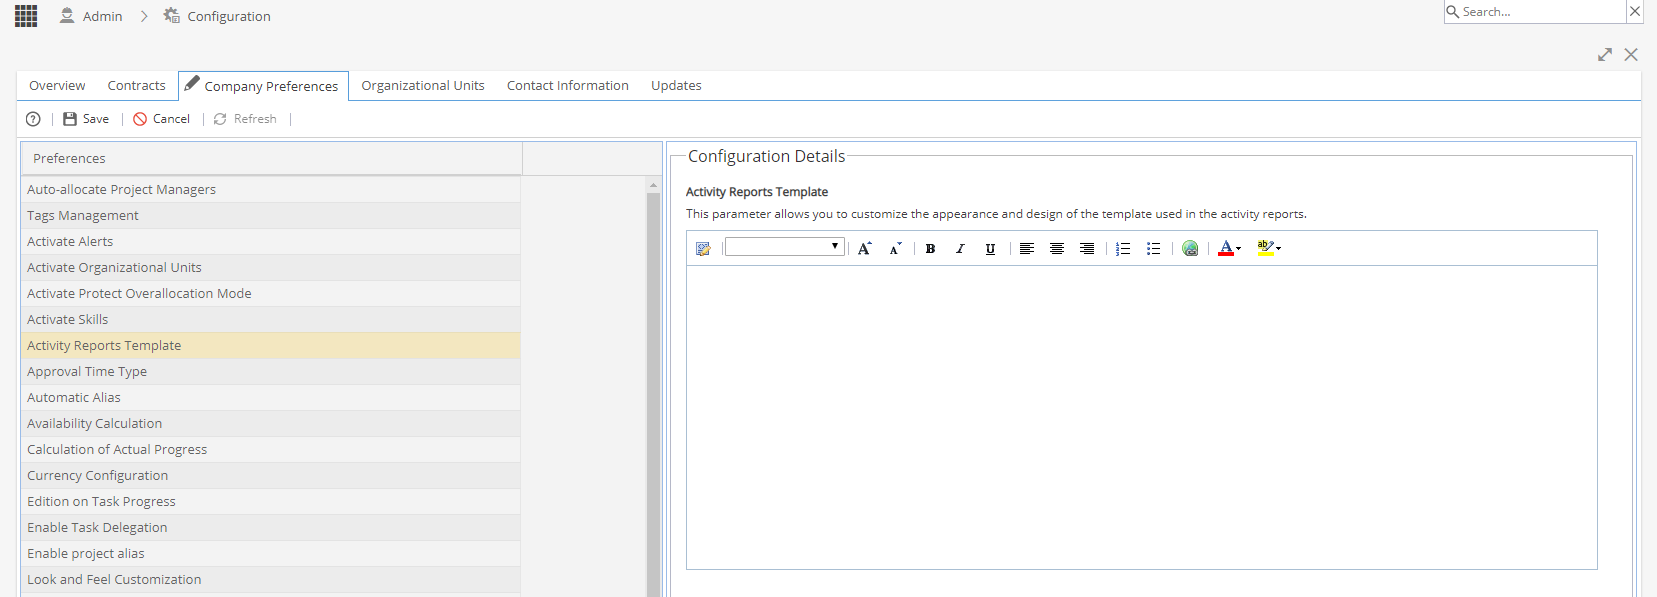
-
Approval Time Type
This option allows you to select if you would like Timesheets approved by Period or Time Log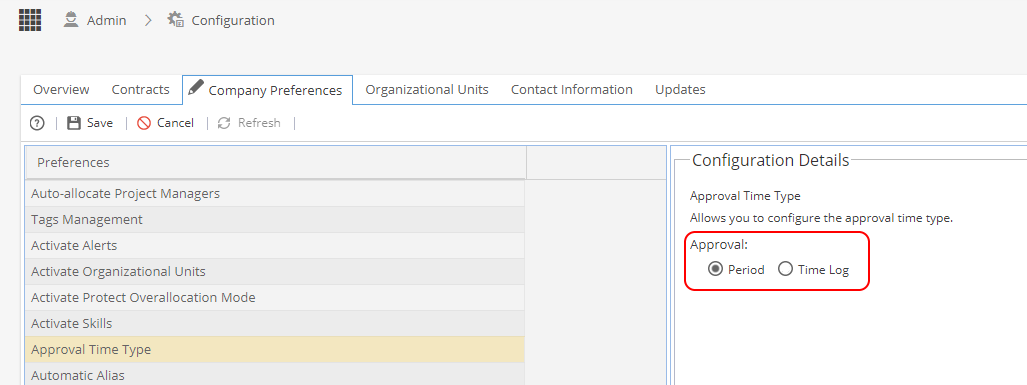
Approval by Period
The periods of time sheets can be monthly or weekly.
These periods of time have two states open or closed.
Open: Allows team members to report hours on the timesheet for tasks they have assigned in the period (Open is the default state)
Closed: Once the Project Manager changes the state to Closed no further hours can be added by team members.
Approval by Time Log
The Project Manager / the delegate for approvals will receive notification when time has been logged by the project team.
For set up of Managers / Delegates see Resources > Teams
For more information seeMy Space > My Approvals > Time Log Approvals -
Automatic Alias- This section allows you to set if the system is automatically creating an Alias for you or if you prefer for some objects to have an alias provided manually by a user when created.
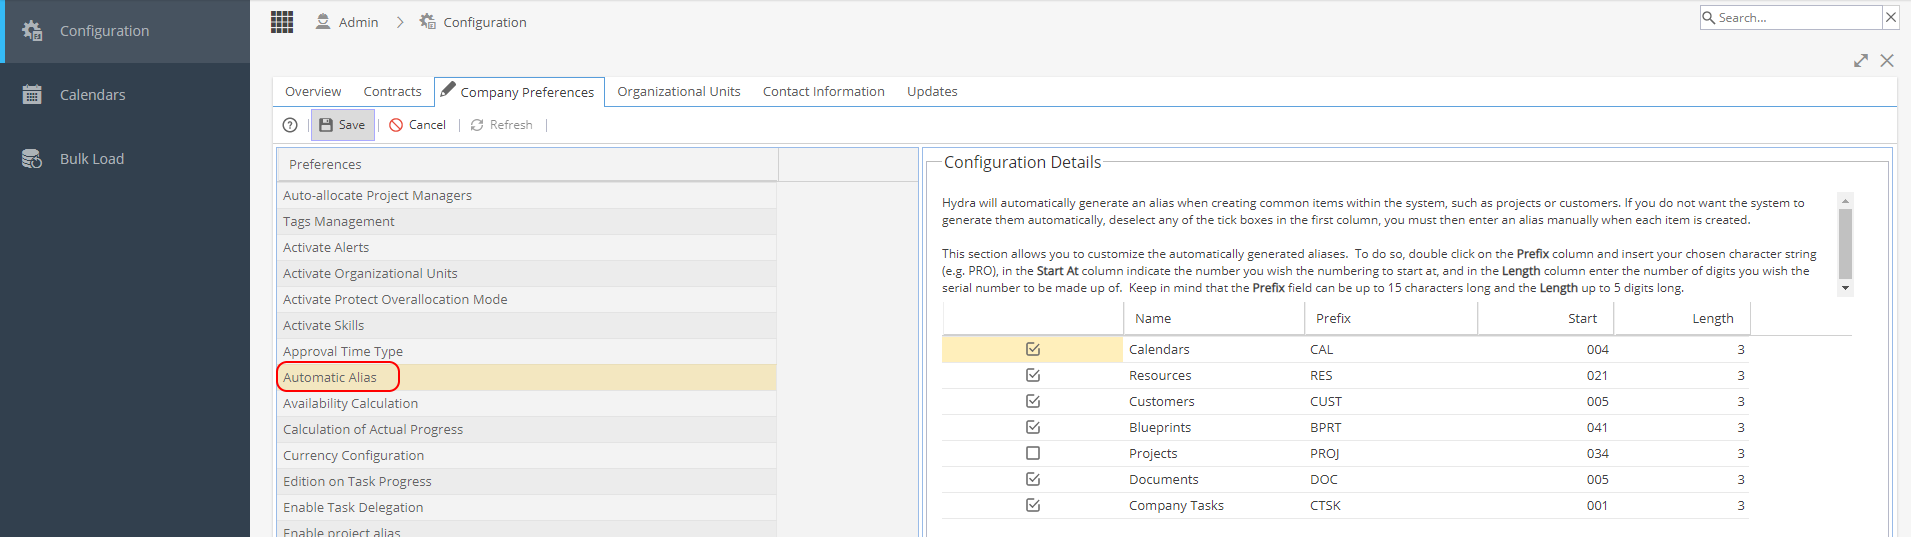
Automatic Alias can be set for the following objects:
- Calendars
- Resources
- Customers
- Blueprints
- Projects
- Documents
- Non-Project Tasks (Company Tasks)
You will need to double click somewhere in the right hand panel to be able to make any edits (a pencil icon will show on the tab called Company Preferences and fields will show white instead of greyed out)
Use the Save / Cancel / Refresh buttons on the top left for any changes.
The tick option allows you to choose between:
Automatic numbering
( Automatic Alias)
Hydra will automatically generate the alias each time a new object is created.
Manual numbering
Each time an item is created you will need to enter the alias manually.
You can also define the prefix , next v alue available (start) and length .
There may be times when it can be useful to not use the automatic alias - for example if you need to give a Project or Resource your own reference to match up with another systems you use (e.g. for Billing). -
Availability Calculation decides if you want the availability of Resources calculation by conversion values or precision.
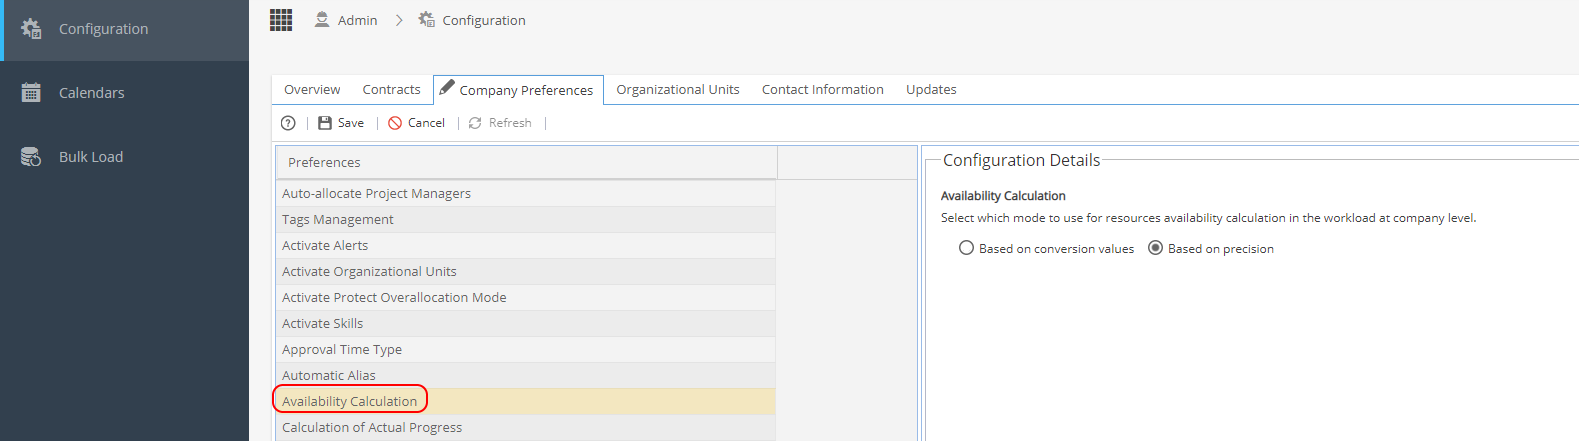
Conversion Values - Hours / Days values from Admin > Calendars > Overview tab used
Precision - Exact number of Hours / Days with values from Admin > Calendars > Calendar Settings tab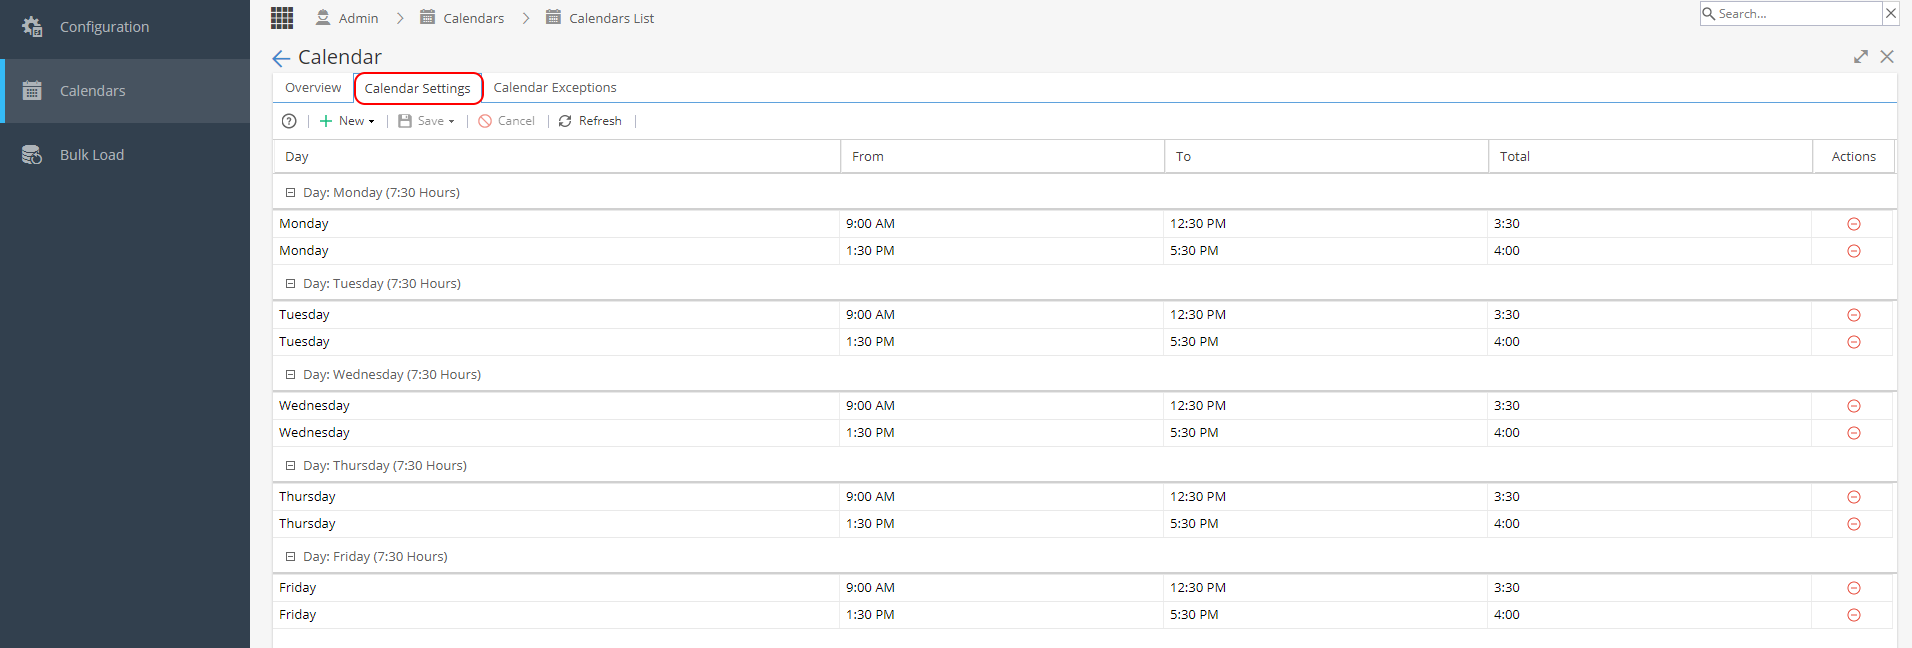
-
Calculation of Actual Progress
This screen is for information only to explain the calculation used, no edits can be made.
Actual Progress will either be calculated by EAC or BAC as shown below: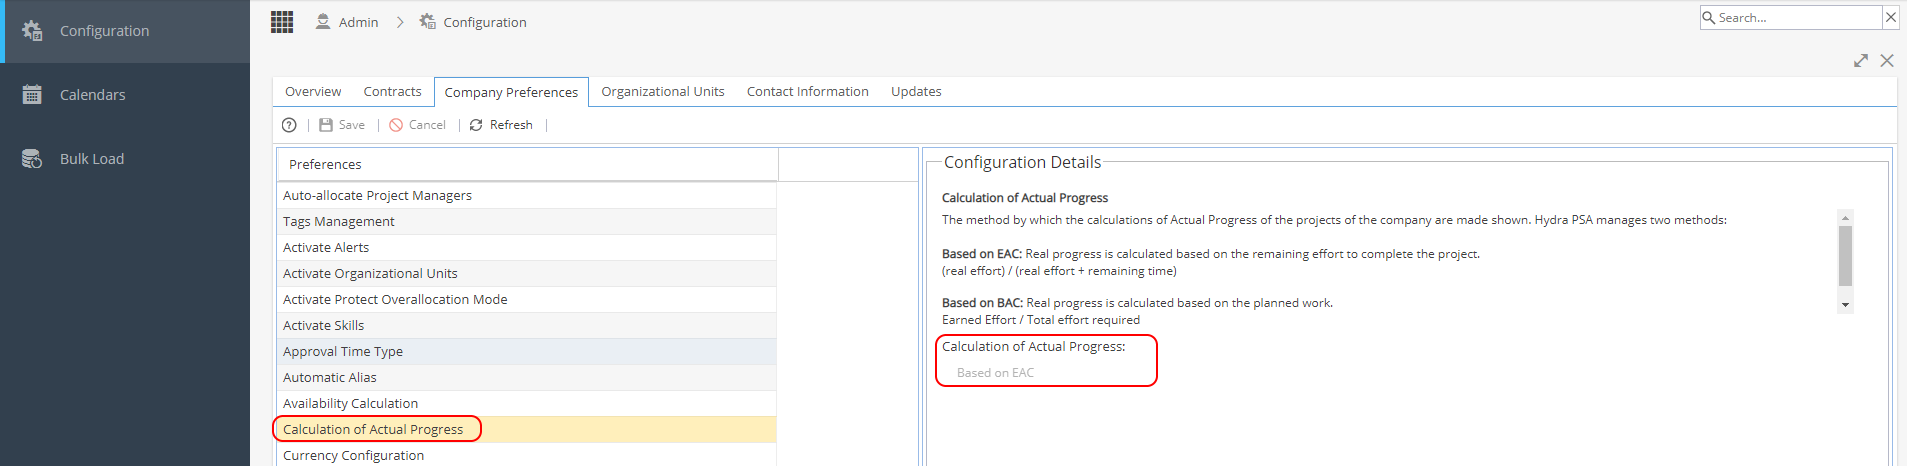
*This option is greyed out as it is selected when a Company is first created. -
This will only apply if your company uses Activity Reports
This option allows you to set if Activity Reports are automatically closed after creation or not.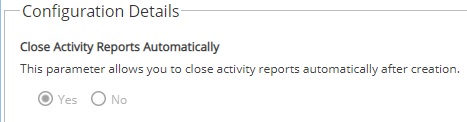
-
Comments for Internal Users Only
Wherever you can add comments / updates to objects in the system, you have the option to tick a box to set the visibility for internal users only.
This setting in Company Preferences allows you to set if you want all comments to be set as default to internal users only.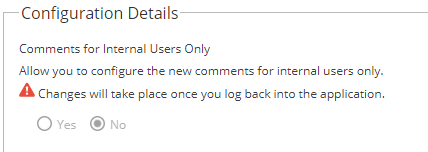
-
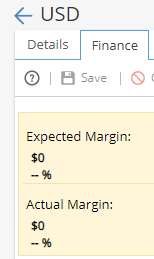
Currency Configuration decides sets the default currency to be used within the system.
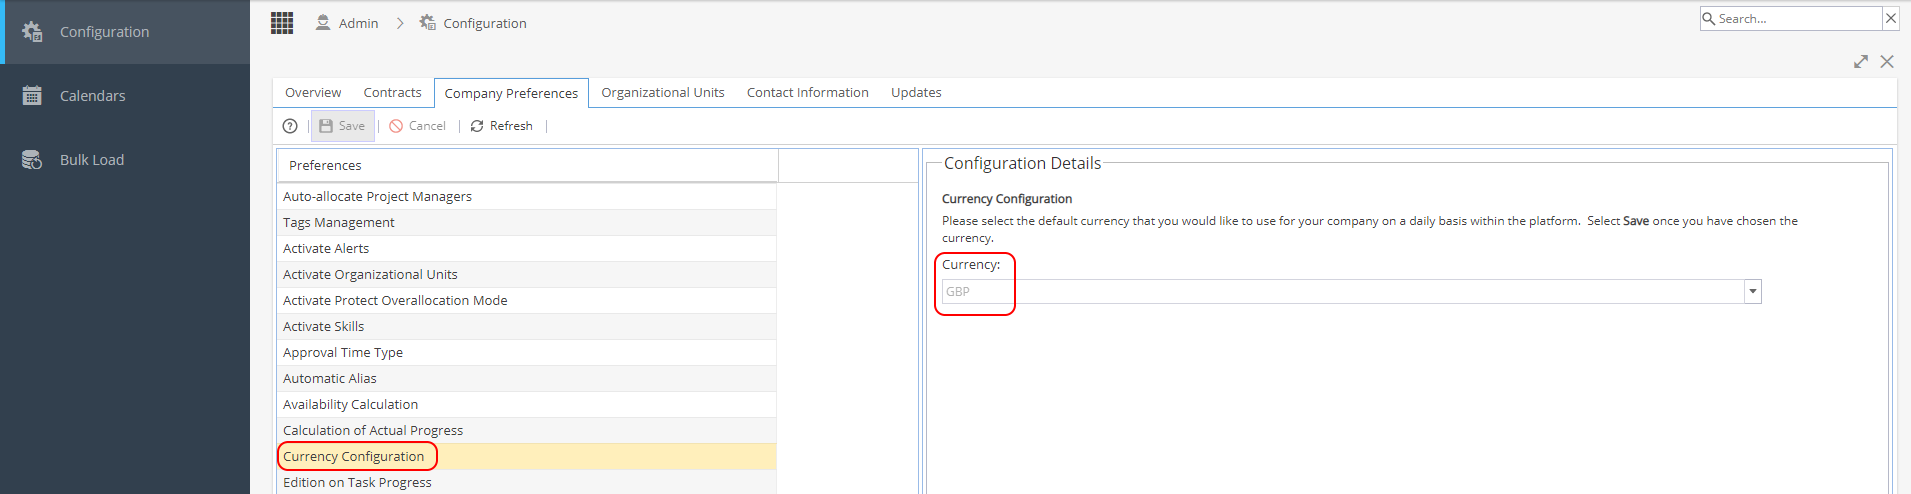
When this is set it will automatically update the currency symbol displayed against costs and rates shown in the Resources menu, no rate conversion takes place the system will only alter the currency symbol shown £, $ etc
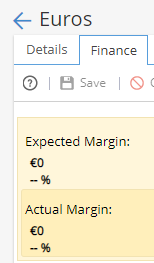
When Projects are created, the finances screens will show the symbol for the currency default at the time it was created and this will remain the same even if the default is updated: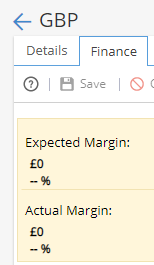
The currency symbol will be reflected in any report widgets showing financial information:
Note: It is recommended you select the most common currency your company would use and stick to this option, you could use Project Custom Fields as another way to report on multiple currencies.
Some report widgets e.g Project Portfolio Summary, will not be able to provide comparison data and some screens e.g. PMO > Forecast can not calculate Totals if different currencies are used. It is possible to use BI to help with reporting instead. -
Edition on Task Progress allows you to define who should be allowed to edit the progress of a Task.
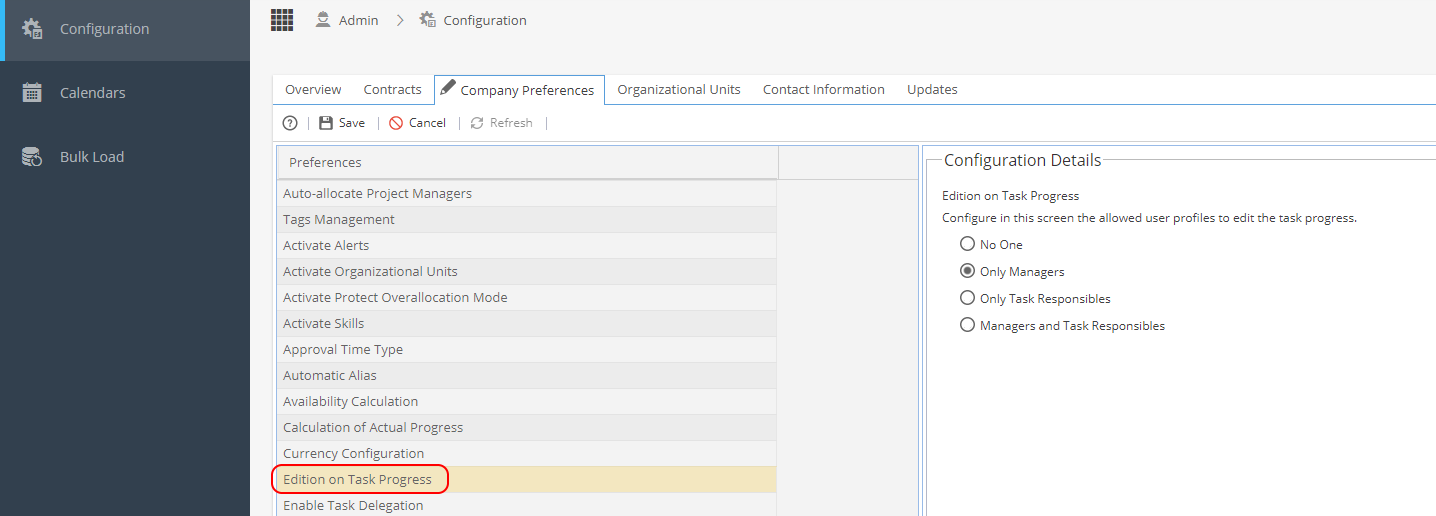
This setting will be the default option used.
This option can still be changed at Project level via Project > Admin > Preferences > Edition on Task Progress -
Enable Cost and Rate by Profile or Resource
Some companies do not use Cost & Rates by Profile, so this option allows them to set if costs and rates should always be taken from the Resource instead.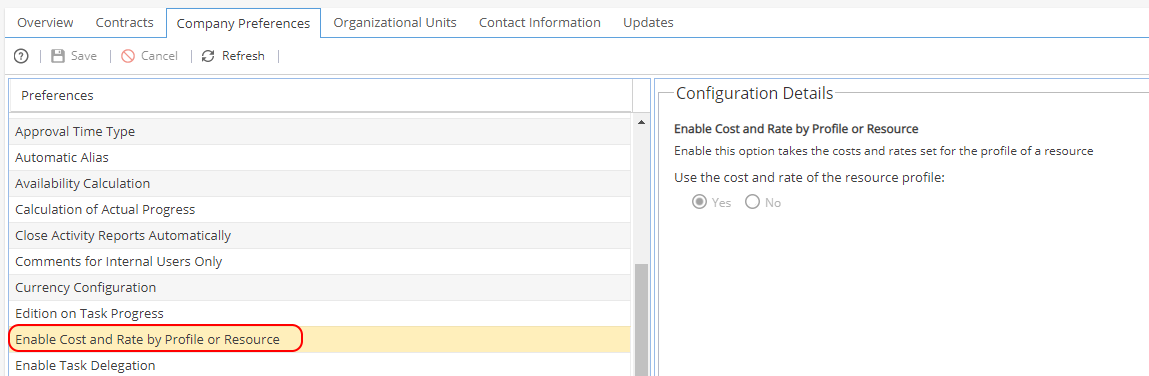
-
Enable Task Delegation - This option allows project managers to assign tasks to people who are not part of their Project team through delegation from the Gantt.

 Note: Delegation is not compatible with Dynamic Assignment and you will only able to assign one user to a task when using delegation.
Enable Task Delegation (if set to No)
When you double click on Assigned Resources from the Project > Schedule > Gantt
You will only have the option to select existing Team Members or Generic Resources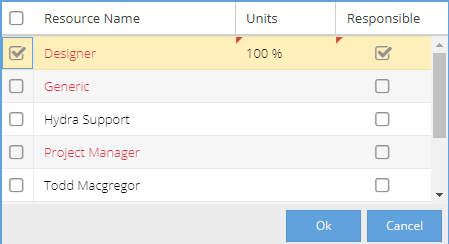
Enable Task Delegation (if set to Yes)
Option will appear to Find Other Resource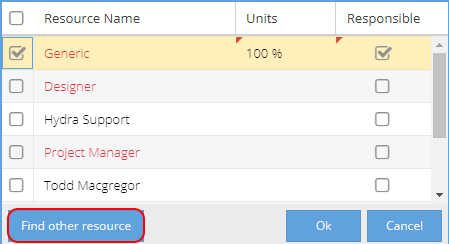
Enable Confirmation of Delegated Tasks (if set to Yes)
*Can only be set to Yes if Enable Task Delegation is Yes.
How a Resource Manager approves / cancels a Delegation request:
1) Go to Resources > Planning > Scheduling
Check the Requests icon to see if any Delegations need to be approved:
2) Tap the Requests icon to only see Resources with Delegations pending:
3) Double Click on the Task with the Yellow bar on the left to view more details.
Acknowledge will accept the delegation
Delete will cancel the delegation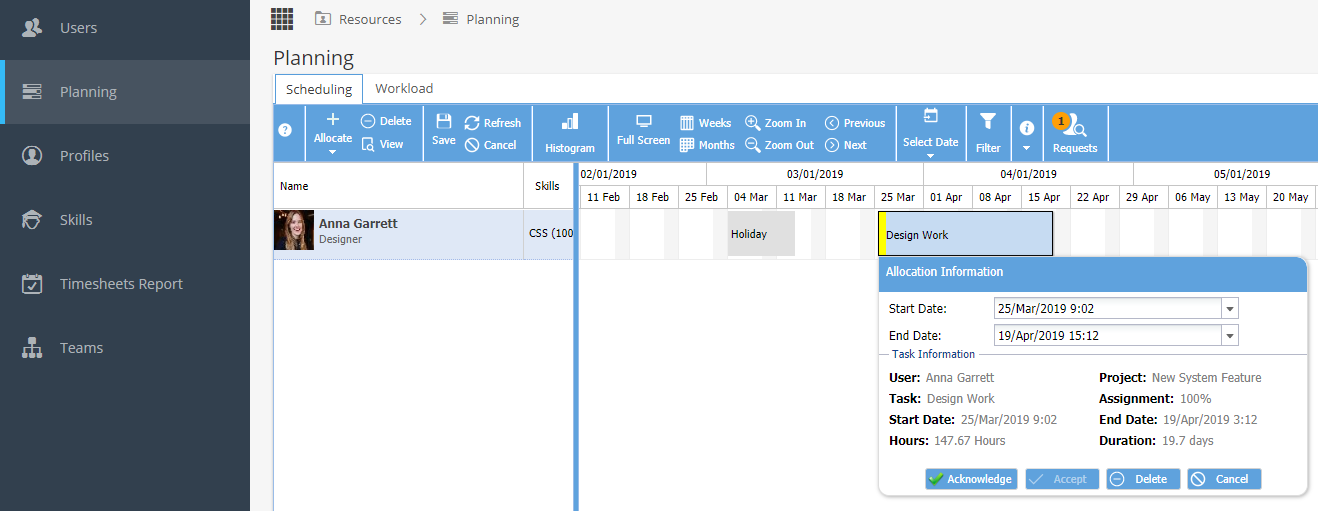
If Delegation is Acknowledged (Accepted)
The colour of the Task will change from Yellow (Pending) to Orange (Planned)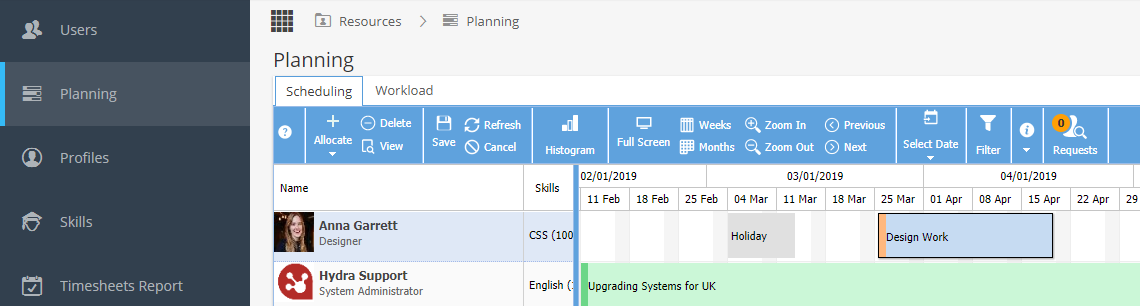
If Delegation is Rejected
The Project > Schedule > Gantt view will show a Warning: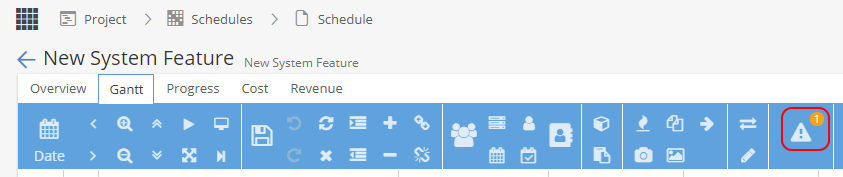
Click on the Warning Triangle to see more details: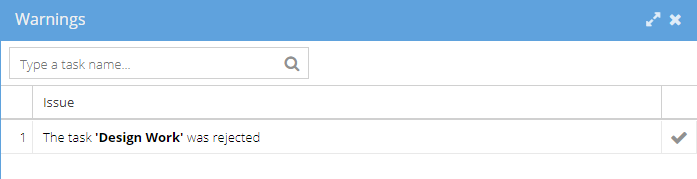
The Project Manager should go to the task and assign a different resource.
The resource where delegation was requested will appear with a strike-through:
-
Enable over-allocated tracking of resources

This option will be set to Yes as the default.
Note the warning - If you change this option to No and Save, this change can not be reversed. -
Enable Simple Project Access
The default setting is Yes.
Note: If this option is set to No you will be asked to confirm as this change can not be reversed.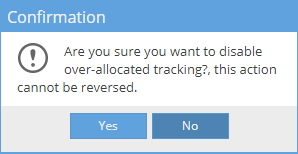
This option affects how Resources are added to Projects.
The Resources > Planning > Scheduling menu will no longer show.
This will be replaced by the Resources > Planning > Access to Project menu. -
Enable Project Alias
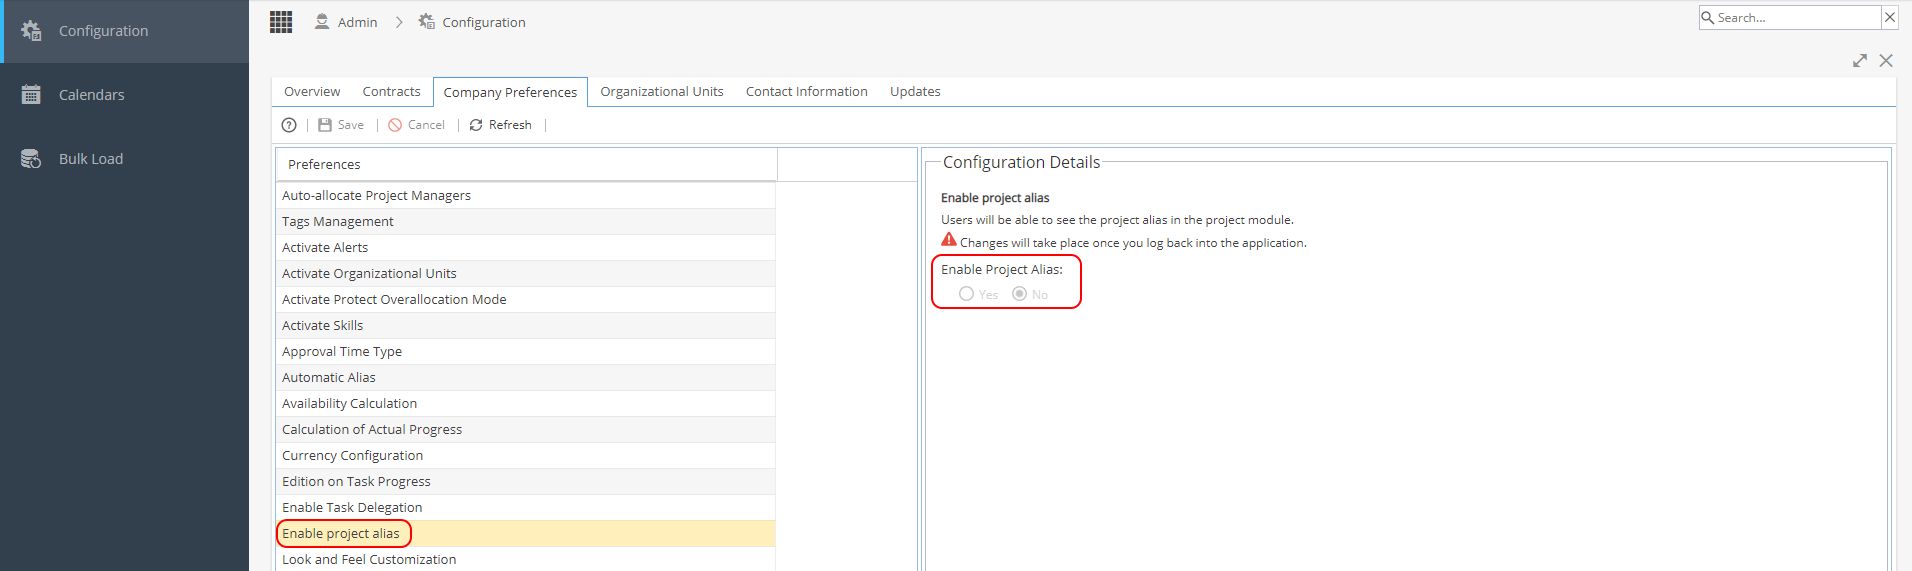
If the Enable Project Alias option is set to Yes
Under Resources > Planning > Scheduling
Project Alias will be visible on the Scheduling view as shown below: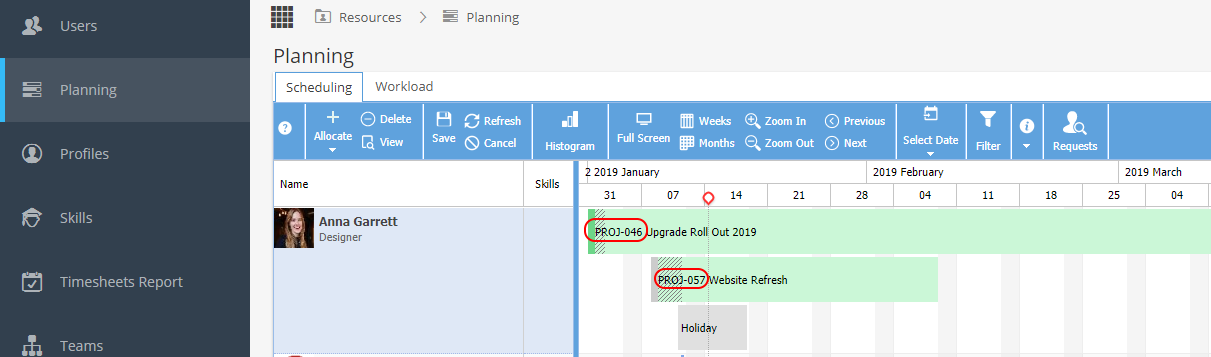
-
Look and Feel Customization
This menu controls the company logo displayed on the top left throughout all views in the system.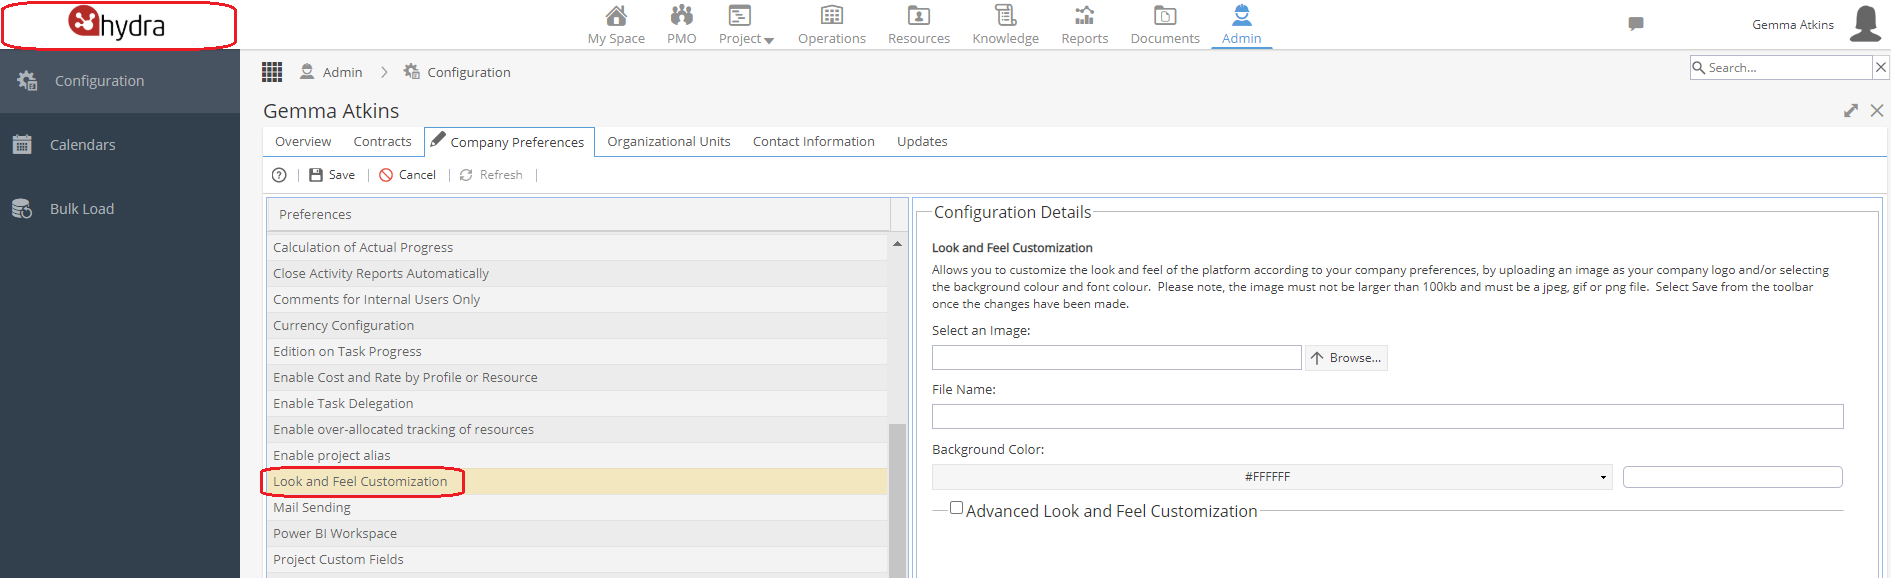
Select an image using the Browse button.
The image should be less than 100 kb
(recommended size is 120 x 45 pixels) in jpeg, gif or png format.
The File Name will automatically update when an image is chosen.
Click Save on the top left, the change will be visible straightaway.
The background colour option will change the background for your logo, so usually this is left as white.
Below this you have a checkbox to set Advanced Look and Feel Customisation options: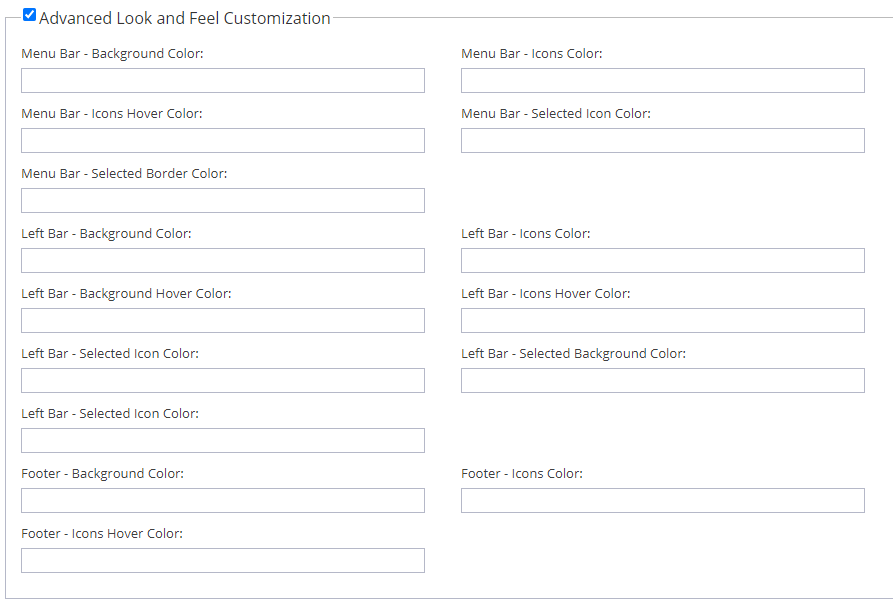
Each box allows you to enter the Hex colour codes.
If the code is not as expected, e.g it does not have the # symbol at the start you will see an error: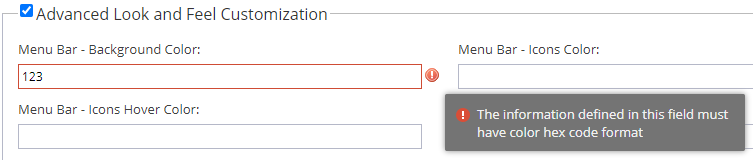
If you make any changes to the colour settings click Save on the top left of the Company Preferences page. If you decide you don't want to use the Advanced options, uncheck the tick box and then click Save. -
Mail Sending
If set to Yes, this option stops all emails from Hydra being sent to system users *except for password reset emails.
If you want to stop emails being sent for specific users this can be updated via Resources > Users > General Information.
Within the System Overview section you have the option to mute emails. -
Power BI Workspace

This option will be blank as the default.
Contact the Hydra Support team if you want to know more information about Power BI. -
Project Custom Fields (Project Form Fields)
These fields allow you to configure fields specific to your company to provide additional information for your Projects.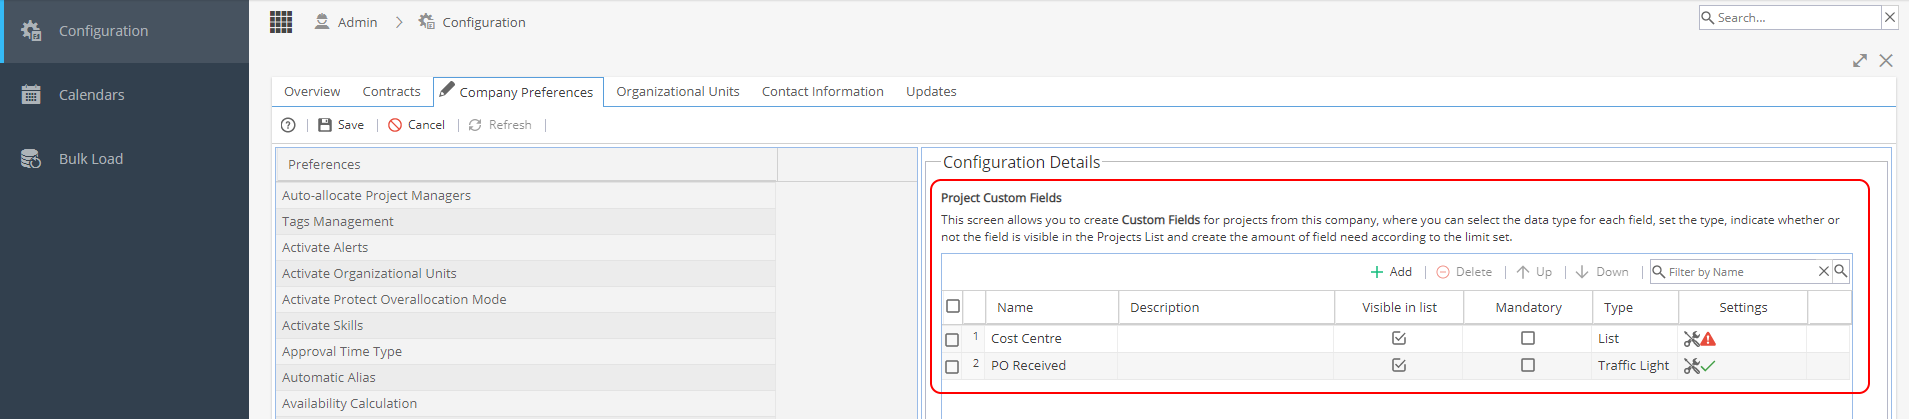
On the top right hand side of Configuration Details you can:
+ Add - Add a new Project Custom Field
Delete - This button will be greyed out until you click to select a custom field
Up / Down - Change the order of your custom fields, these buttons are also greyed out until a custom field is selected
Filter by name - Type to search by partial name
The custom fields have these columns:
Name
Description - Optional, will be shown in the tooltip
Visible in list - If you want the custom field shown as a column in the PMO menu > Projects List view
Mandatory - If this field must be completed
Type & Settings - See table below:
Traffic Light Icons
Default settings when first selected: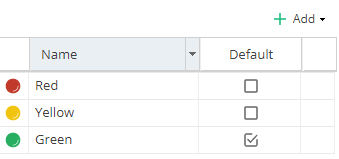
Options available from + Add: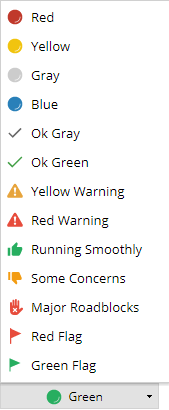
Note: The names can be updated and the default option will be used is no other option is selected.
If the settings shows a red warning triangle the settings have not been configured.
Even if ticked as visible / mandatory the custom field will not show.
Click on the spanner icon to configure, save the changes and make sure the green tick shows: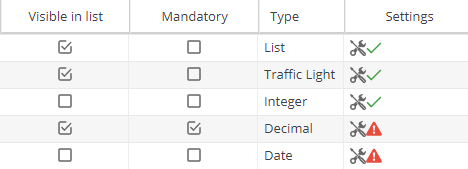
Whenever Project Custom Fields are updated here, the changes apply across the system and will affect all Projects for your company (Draft, Live or Closed).
Where can Project Custom Fields be seen in the system?
PMO > Projects > Projects List (*If Visible in list option is ticked)
PMO > Projects > Projects List > + New - Form section
PMO > Projects > Project Details - Additional Information section
Project > Project Home > Overview - Additional Information section
Reports - Project Dashboards - General Project Info Widget
Reports - Company Dashboards - Tabular View Widget (when Item selected is Projects)
Resources > Capacity (Filters for Initiatives) -
Resources Custom Fields
These fields allow you to configure fields specific to your company to provide additional information for your Resources.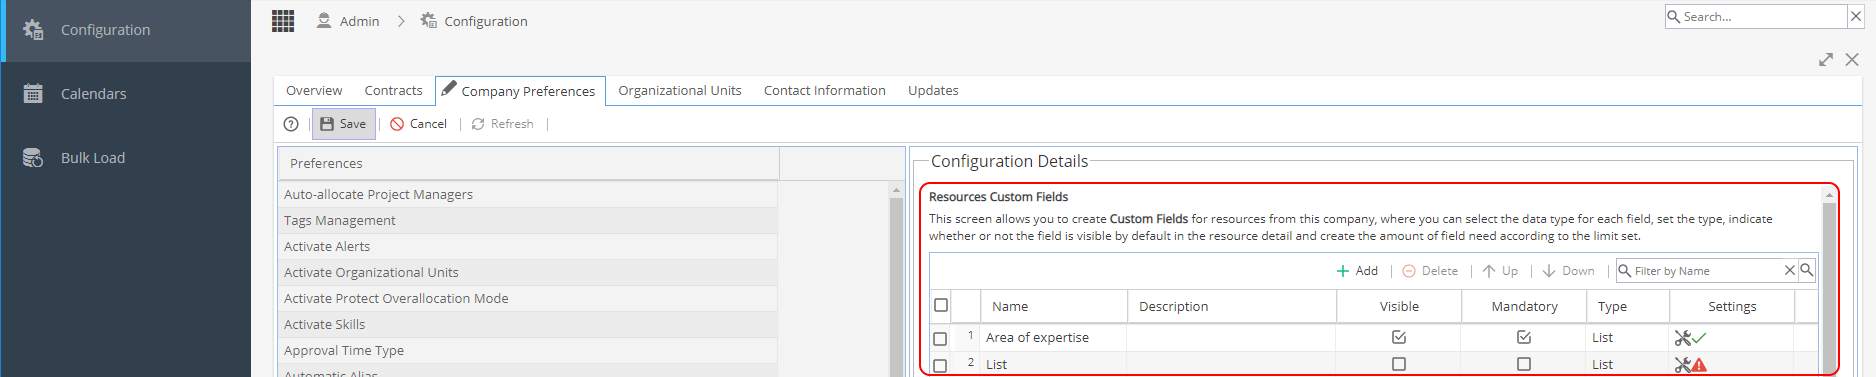
On the top right hand side of Configuration Details you can:
+ Add - Add a new Project Custom Field
Delete - This button will be greyed out until you click to select a custom field
Up / Down - Change the order of your custom fields, these buttons are also greyed out until a custom field is selected
Filter by name - Type to search by partial name
The custom fields have these columns:
Name
Description - Optional, will be shown in the tooltip
Visible in list - If you want the custom field shown as a column in the PMO menu > Projects List view
Mandatory - If this field must be completed
Type & Settings - See table below: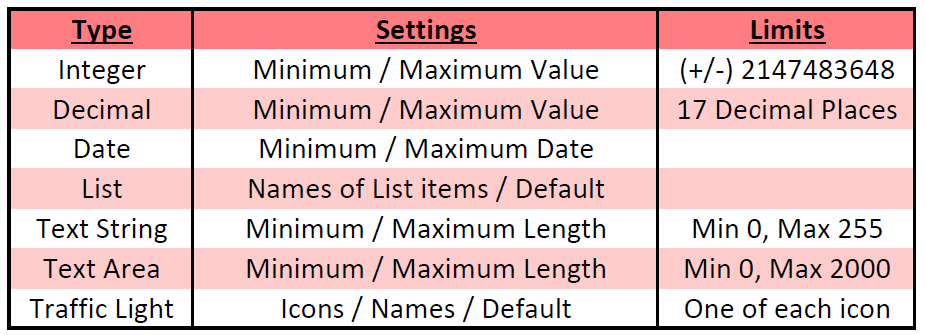
Traffic Light Icons
Default settings when first selected:
Options available from + Add:
Note: The names can be updated and the default option will be used is no other option is selected.
If the settings shows a red warning triangle the settings have not been configured.
Even if ticked as visible / mandatory the custom field will not show.
Click on the spanner icon to configure, save the changes and make sure the green tick shows:
Whenever Project Custom Fields are updated here, the changes apply across the system and will affect all Projects for your company (Draft, Live or Closed).
Where can Resource Custom Fields be seen in the system?
Project > Project Home > Team tab (General Information tab for a user - Additional Information section)
Project > Admin > Project Users (General Information tab for a user - Additional Information section)
Resources > Users > General Information tab - Additional Information section
*From the Resources menu there is an eye icon which also allows for control of visibility of the resource custom fields
Resources > Planning > Workload tab - From the filter, you can select Advanced to use Custom Fields -
Revenue Model for Project Tasks
Configure the revenue model to be used for Project Tasks at Company Level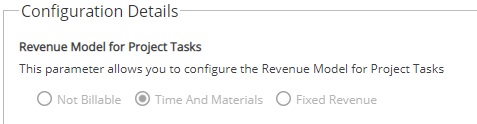
This option can also be configured at Project Level via Project > Admin > Preferences -
Schedule Grouping
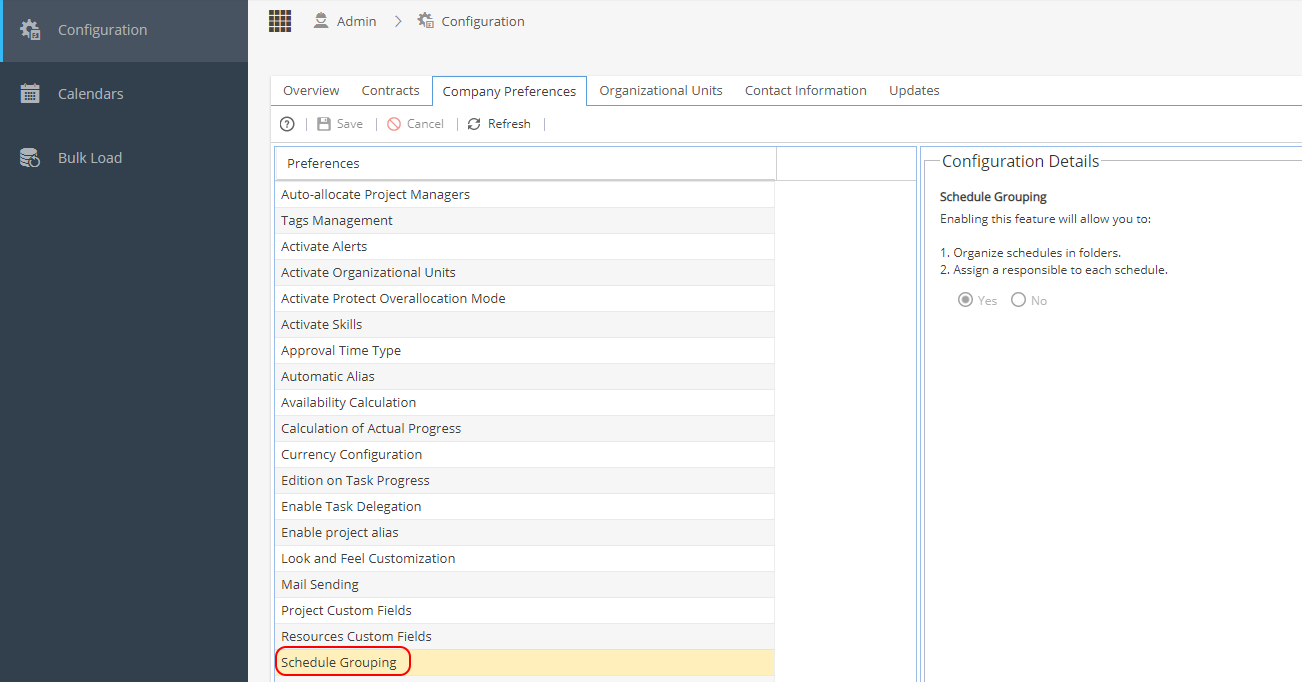
This option can only be set to Yes or No.
This affects 2 areas of the Schedules:
1) Organise schedules in folders
Project > Schedules > Schedules List
If Schedule Grouping is set to Yes extra options will be available on the + New button
This allows to add New Folders to organise Schedules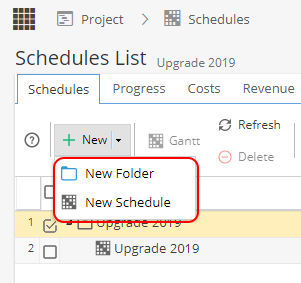
2) Assign a responsible to each schedule
Project > Schedules > Schedule > Overview
If Schedule Grouping is set to Yes an extra option will be available in the Details section to assign a user Responsible (If set to No, the Responsible option is not available)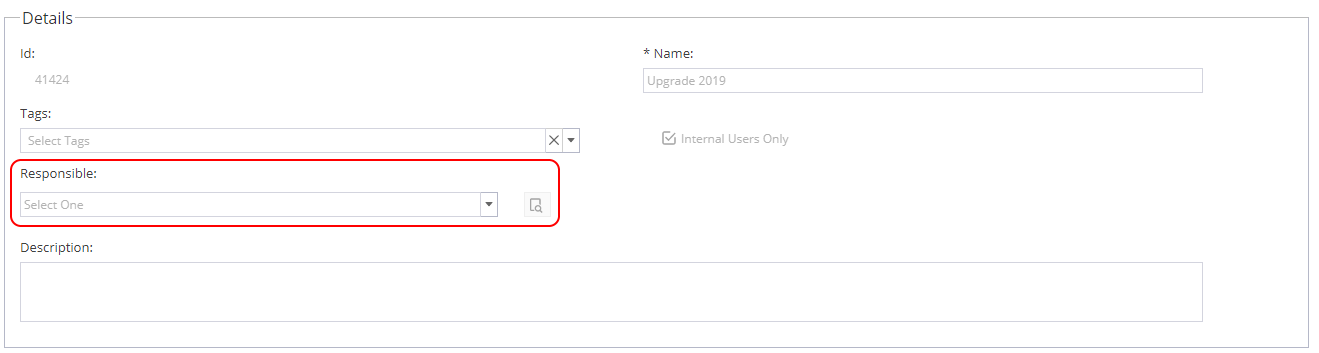
-
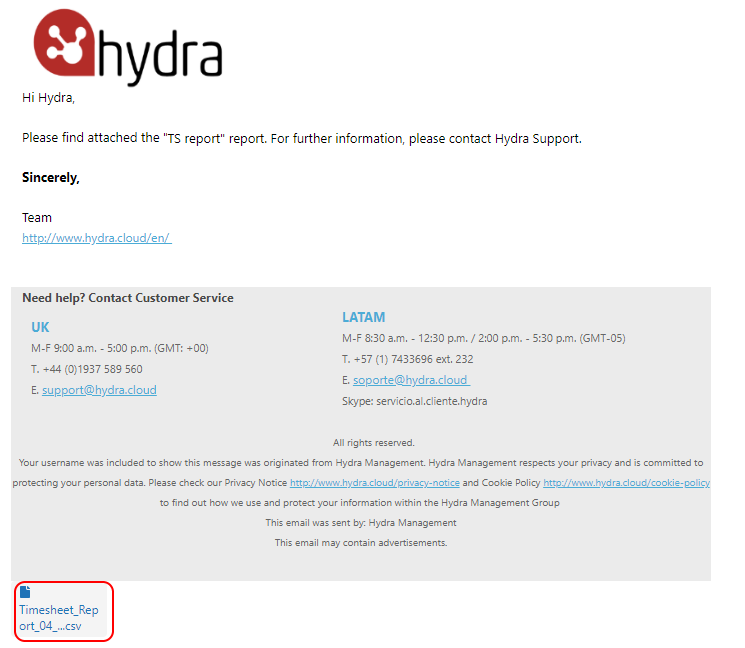
Scheduling Report Delivery
This option applies to Reports in the system:
Company Dashboards
Project Dashboards
Resources > Timesheet Reports
Note: My Space > Overview - Widget for 'My Dashboards' allows the Dashboard view to be exported as a one off, this view does not have the scheduling option but if you are the "owner" of a Dashboard you can go to Reports and access scheduling.This setting will be applied when a Report has the "send the report periodically" option ticked:
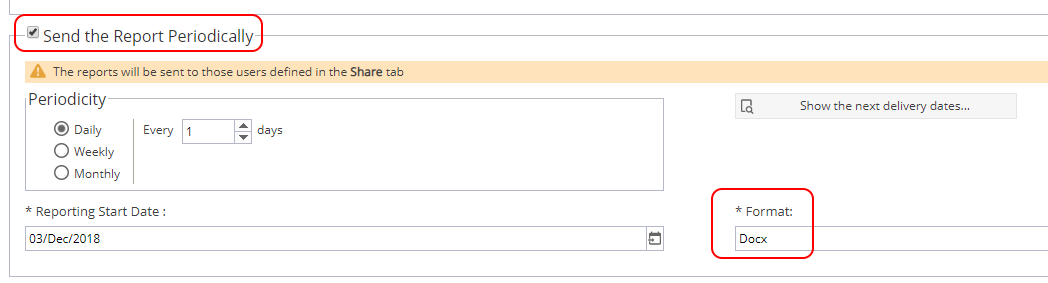
You can specify if the report email has a document attached or a download link:

Example of email with attachment:
Example of download link email - this has an expiry date:
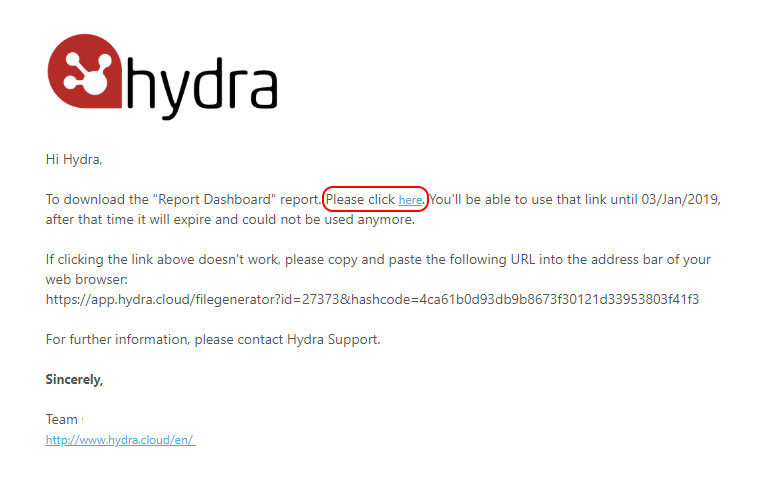 If Email Attachment has been selected but the report generated exceeds the limit for email attachments, we will send an email with a link instead.
 -
Sharing ID
This ID allows for sharing of Blueprints or to link Projects with Actions in a system called EXM.
-
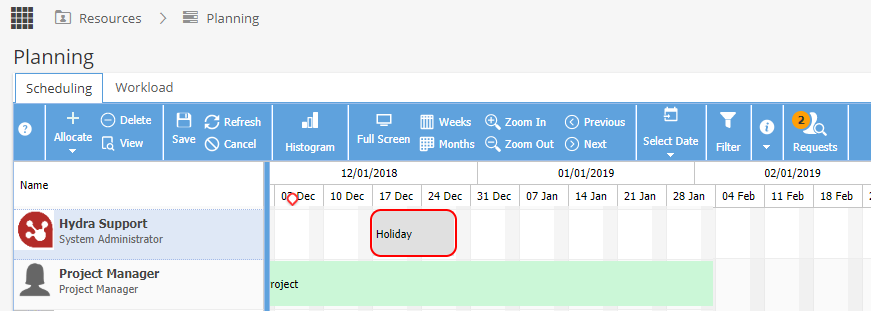
Time Types - Administrative
Time Types set up different options users can log time against, administrative times are not directly related to a Project but still need to be recorded e.g. annual leave.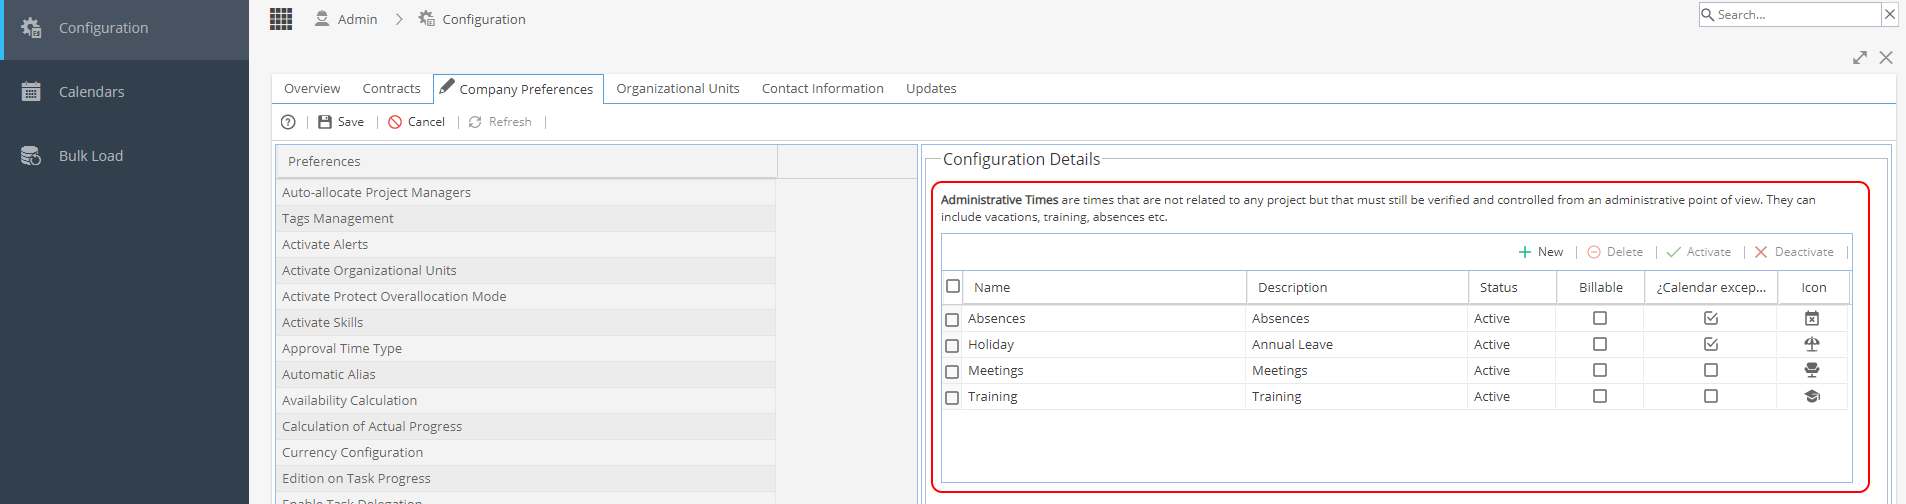
Double click in the configuration details panel to edit, you can:
+ New- Add a new Project Time Type
Delete - This button will be greyed out until you click to select a time type
Activate / Deactivate
Set the Name
Add a Description
Set if the time type is Billable
Set if the time type should show as a calendar exception
Choose an icon to show
Where can Project Time Types be seen in the system?
My Space > My Timesheets (+ Add - Administrative)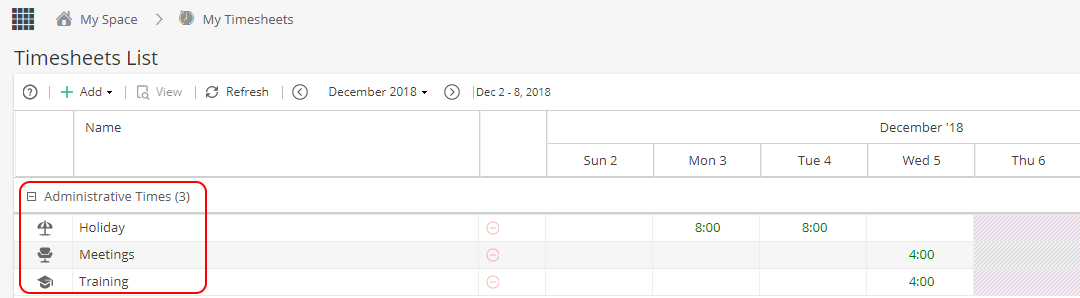
My Space > My Calendar
Resources > Planning > Scheduling (+ Allocate > Admin Time)
Resources > Timesheets Report (*Include Admin Times must be ticked)

-
Time Types - Project Related
Time Types set up different options users can log time against which could have different rates applied in the Project.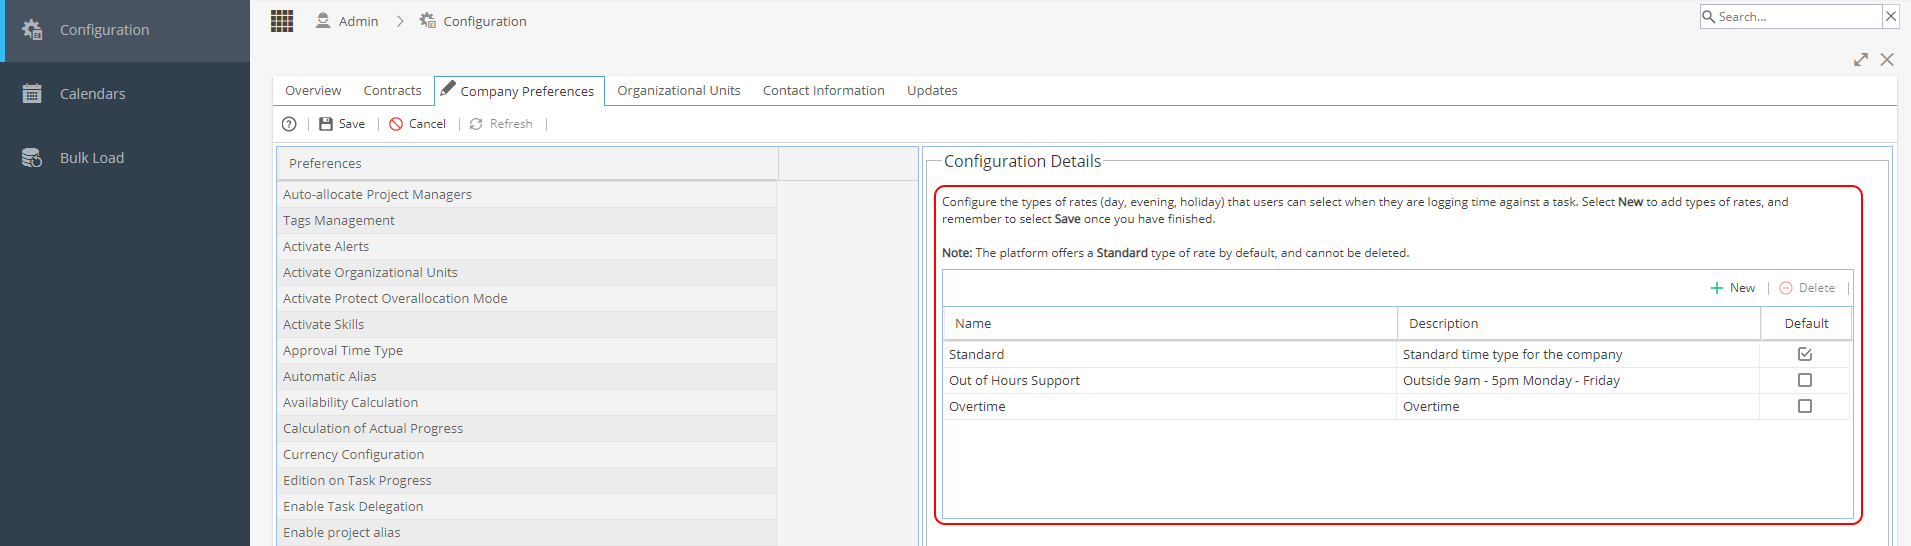
Double click in the configuration details section to edit, you can:
+ New- Add a new Project Time Type
Delete - This button will be greyed out until you click to select a time type
Set the Name
Add a Description
Set the Default option to be used
The Time Types used for a Project can be set in:
Blueprint > Template Project > Finances > Costs and Rates
Project > Finances > Costs and Rates
Under Activate, tick any time types you would like to be available to log time against for each profile type.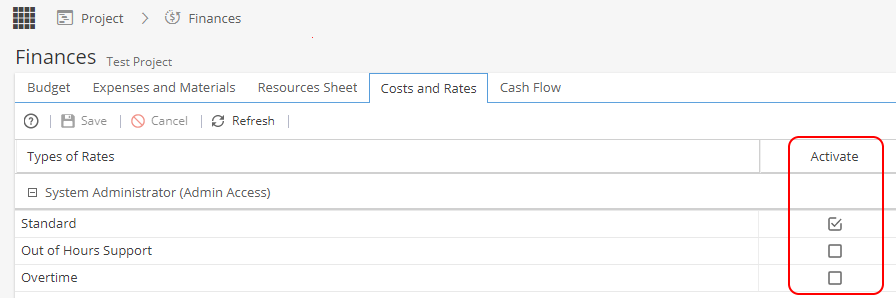
When on a Timesheet, you will have a down arrow to log time against a specific time type: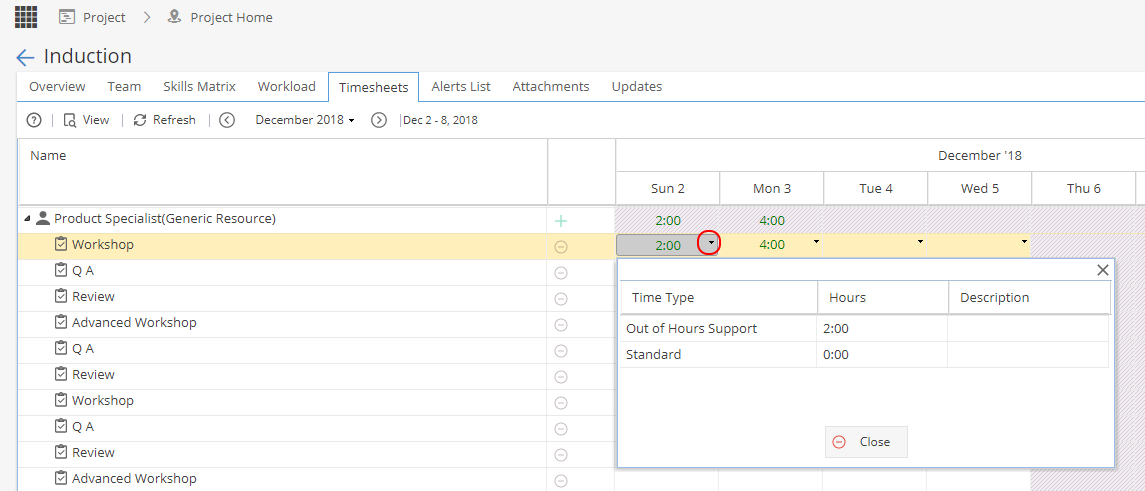
Note: If the down arrow does not show, it means only one time type is available so there are no options to select from.
Where can Project Time Types be seen in the system?
Knowledge > Blueprint > Template Project > Finances > Costs and Rates
Project > Finances > Costs and Rates
Project > Finances > Resources Sheet
Project > Project Home > Timesheets
My Space > My Timesheets
Resources > Timesheets Report -
Timesheet Load

The default option is No
No will show any Tasks which should be worked on, including tasks which are running late.
(Note: If your Resources have a lot of Tasks this view can go across multiple pages)
If you set the Timesheet Load option to Yes
This option limits the timesheet view so you will only see Tasks where time logs already exist for the week shown.
The Resource is responsible for using the +Add button on the top right to "build" the timesheets by adding in each Task etc they want to log time for.
-
Tracking Mode Non Project Tasks
For more information on Non Project Tasks, click here.
For a Non-Project Task, you do not go through the same setup screens as Projects, the default options for the Preferences of Time Logging and Progress Tracking can be set here: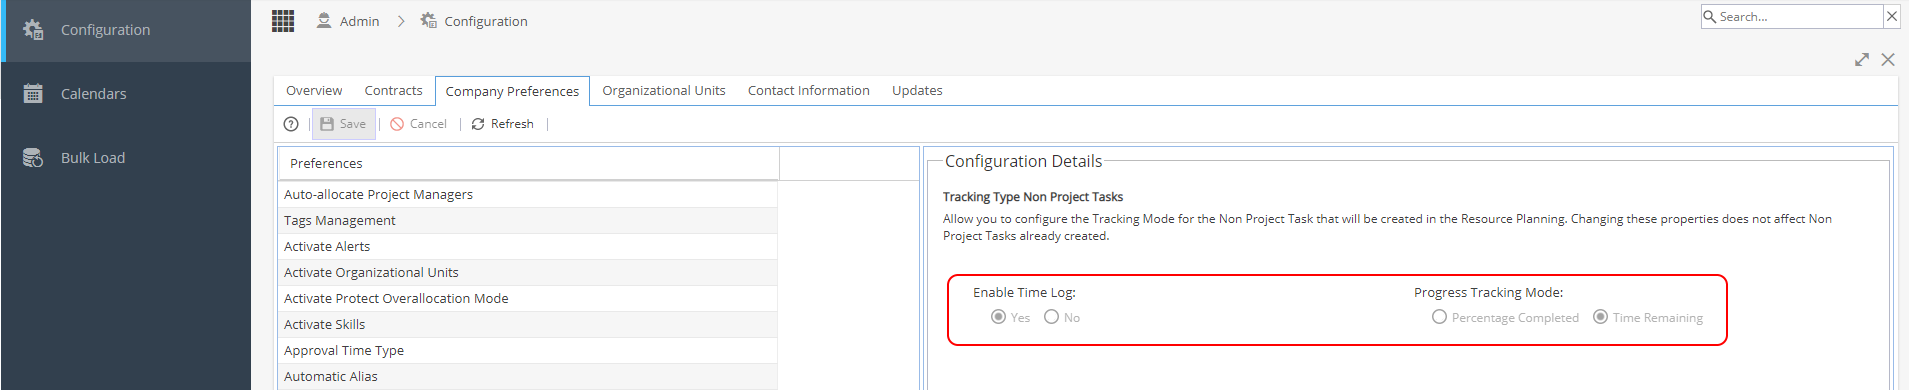
Existing Non-Project Tasks can be seen from Resources > Planning > Scheduling or via Operations > Tasks.
From the Task Details you will see the same Preferences options as for Projects and can update the settings for the individual task if they need to be changed from the default option.
Note: Changing this setting will not make any changes to existing Non Project Tasks, only ones created in the future after saving. -
User Creation from the Project Team decides if you want to allow Project Managers to create new users from the Project > Project Home > Team tab.

If set to No (Default), the Team tab will look like this:
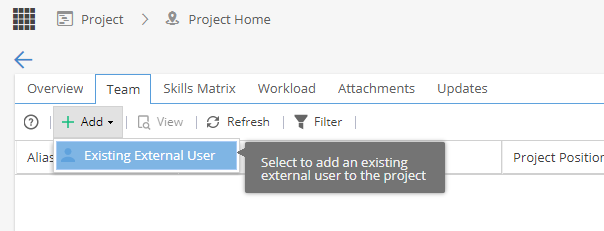
With No selected, only existing external users can be added to a Project from this screen.
If you need an internal user to be added to the Team, this would be done by allocating the Project to a user via Resources > Planning > Scheduling or when Tasks are assigned to a Resource from the Gantt
If User Creation from the Project Team is set to Yes, the Team tab will have the extra option to + New User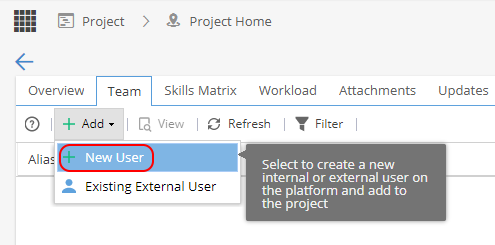
This will take the Project Manager to this screen to Create a User: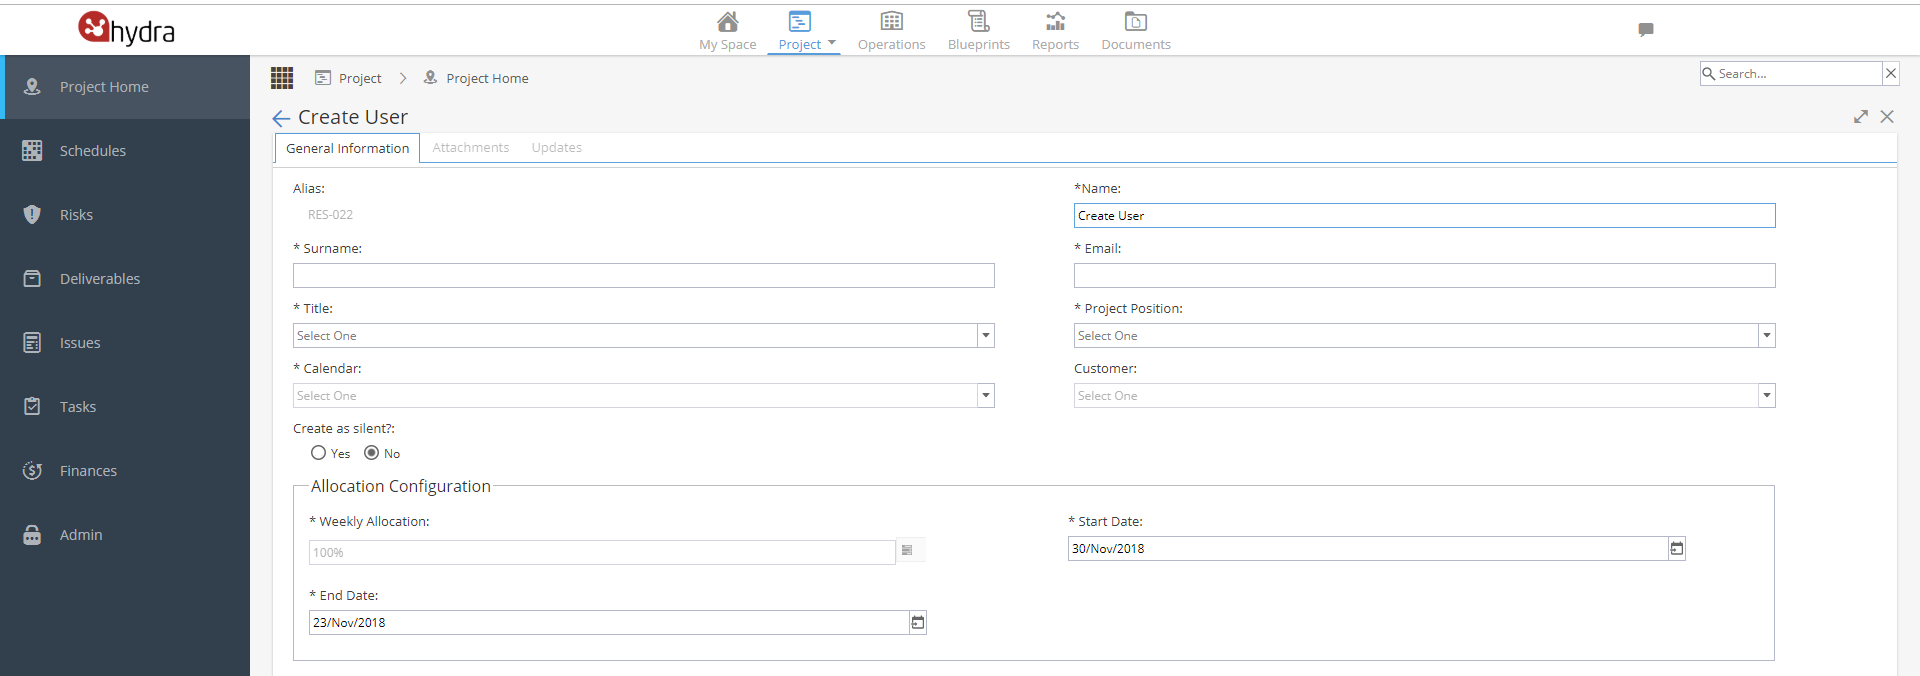
Users created in this way will appear in the Resources > Users as Internal / External depending on the Project Position (Profile) selected for them.
The Project Manager creates the users via the Project and will not have any access to the Resources menus to make further edits (unless their own user profile already allows them to). -
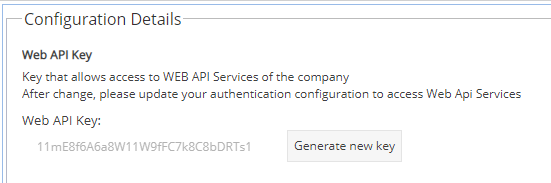
Web API Key
An application programming interface key (API key) is a unique code that is passed in to an application programming interface (API) to identify the calling application or user.
API keys are used to track and control how the API is being used, for example to prevent malicious use or abuse of the API. The API key acts as a unique identifier and a token for authentication.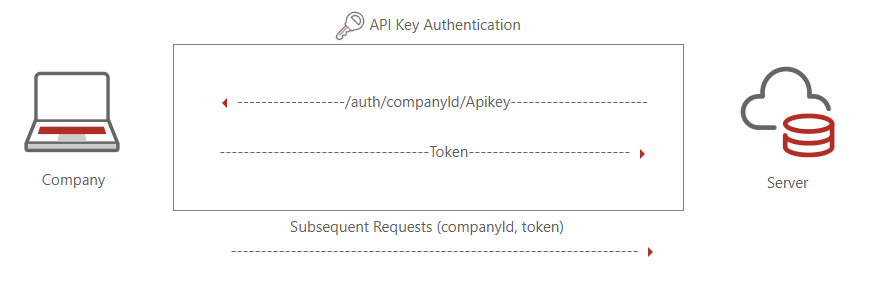
If a Key has never been generated before, you will see a Grey button saying Generate Key:
If a key was previously generated you will have the option to copy the existing key or generate a new key.