My Timesheets provides an easy way to enter time against multiple tasks.
When viewing your Timesheets List the system will show you Tasks that:
- Are assigned to you with a start date of the current week shown (or earlier)
- Are currently In Progress or running Late
- Are Waiting for Approval
- Have been Completed in the current week
Understanding the Timesheet View
-
Column Description Name Shows the name of the Task, Administrative Time, Unscheduled Event or Non Project Task.
Tasks: are activities assigned to you, which are planned within a Schedule and contribute to the progression of a Project.
Administrative Times: are related to your Company but not to a Project. This would include time such as annual leave or sickness.
Unscheduled Event: these are activities that are related to a project but are not planned within the Schedule, such as: additional meetings or travelling to see the customer.
Non-Project Tasks: These are additional activities assigned to you, which are not scheduled within a Project Schedule, such as supporting another area of the company.Status Status will only be available for Project Tasks or Non Project Tasks.
 - Planned
 - In Progress
 - Closed
 - Waiting for Approval
 - Cancelled
-- - Not Applicable (Admin Times or Unscheduled Events)Start Date This field will only show a Start Date for Project Tasks or Non Project Tasks.
Due Date This field will only show a Due Date for Project Tasks or Non Project Tasks. Health This field will only show for Project Tasks or Non Project Tasks.  Grey - Not Yet Started
 Green - On or ahead of Schedule
 Red - Running late / behind Schedule
 Blue - Completed (or Cancelled)
Click to read more about HealthCondition An indicator separate to health, to show how you feel the Task is going.  - Running Smoothly
 - Some Concerns
 - Major Roadblocks
 - Not Reported
Schedule Name of Schedule (applies to Project Tasks only). Deliverable Name of Deliverable (if applicable - for Project Tasks only). Effort The expected number of hours (and minutes) to complete the Task. Duration The number of days set to complete the Task. Priority A Priority can only be set for Project Tasks or Non Project Tasks.  - Low
- Low - Medium
 - High
-- - Unassigned
The Priority is set in the Task Overview and is View Only on the TimesheetWeek / DaysWhen entering your list of time sheets the system will show you the current week and below you will find the days corresponding to the week (from Sunday to Saturday). Use the arrows or click on the Month/Year from the top left to change the week displayed.
Any future dates will show greyed out as time sheets can only be updated to reflect the work which has taken place.Total This column gives the total hours recorded for the week displayed for each row. Remaining The Remaining Effort shows the time needed to finish with the Task. Remaining Effort is calculated by the system using the estimated effort for the task minus the actual time logged on your Timesheet.
If you need more or less time to complete a Task, this can be adjusted manually.Note: This column will only be displayed if you are assigned to Projects (or Non Project Tasks) where the Progress Tracking Mode is set to Remaining.
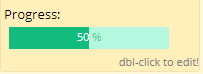
Progress The Progress shows the % complete for the Task.
Time will still be logged but the Progress % is updated manually.Note: This column will only be displayed if you are assigned to Projects (or Non Project Tasks) where the Progress Tracking Mode is set to Percentage Completed.
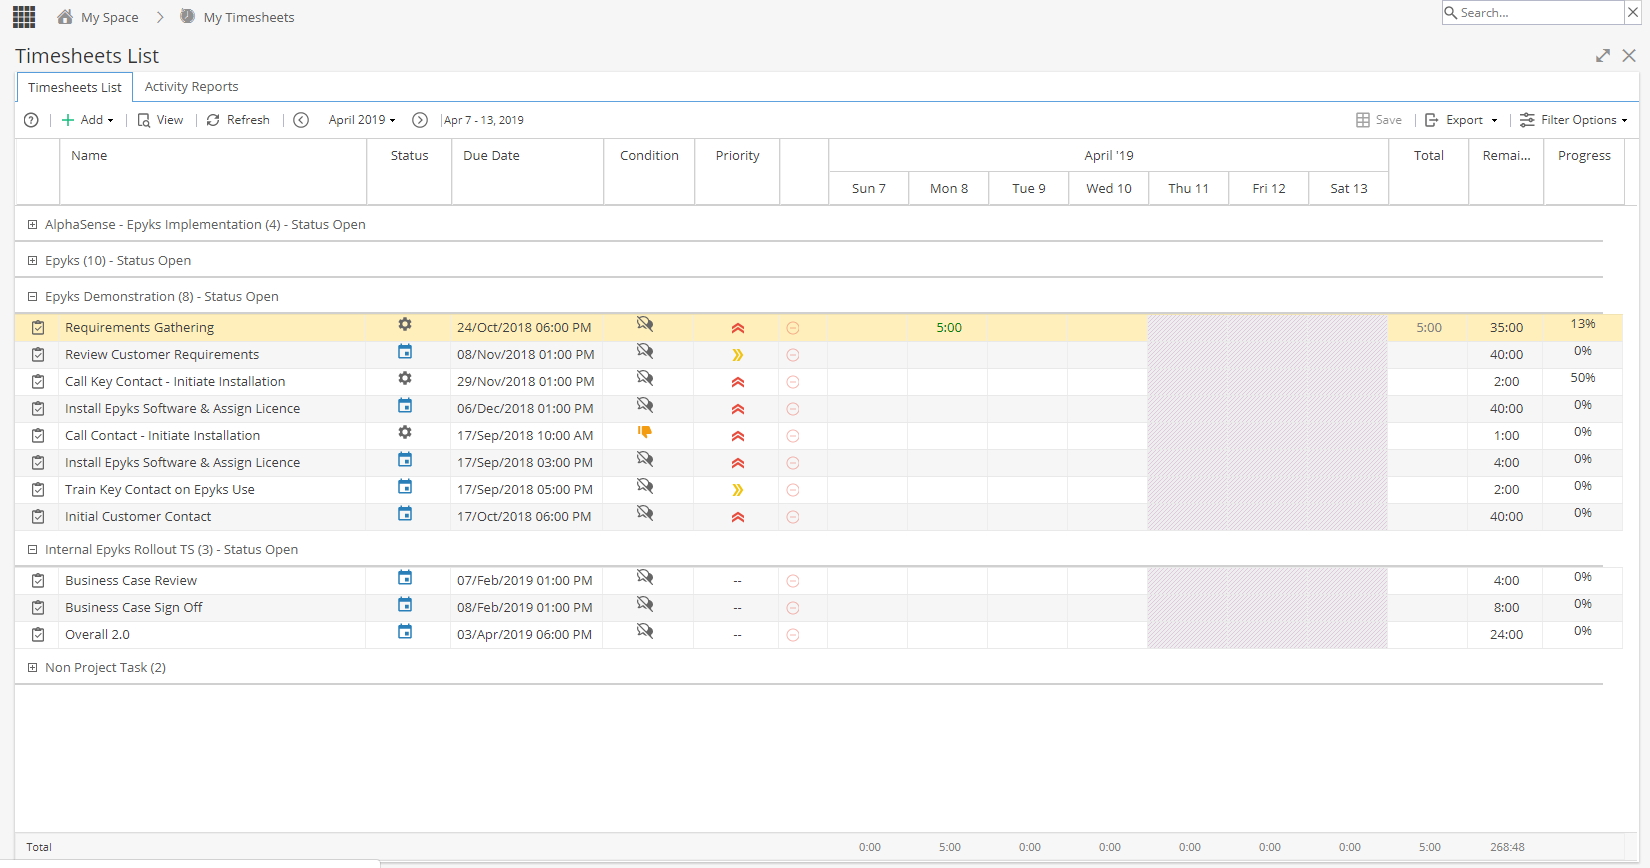
The Rows are grouped into sections which can be expanded / collapsed: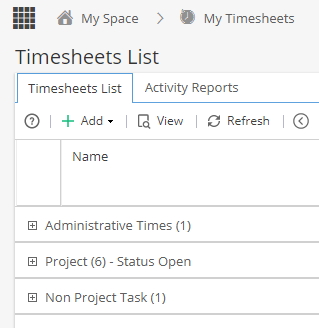
Row Description Administrative Times Admin Times relate to your Company, not to Projects.
Examples of Admin Time: Annual Leave, Sickness, Training.Project You will see any Tasks or Unscheduled Events for a Project grouped together under the Project Name.
Tasks are planned in advance as part of the Project.
Unscheduled Events may not be planned but still need the time to be logged.
For example: Project Meetings or TravelNon Project Tasks Groups together any Tasks which do not relate to a Project e.g. being on loan to support another team.
This group will not be visible if you do not have any Non Project Tasks allocated to you.
(Read more about creating Non Project Tasks)Total This row gives the Total hours recorded in the week per day, per week and time remaining (if applicable). -
Hovering your mouse over some of the columns will give you a drop down arrow.
This gives you the option to choose which optional Columns you would like to include / exclude in your Timesheet view.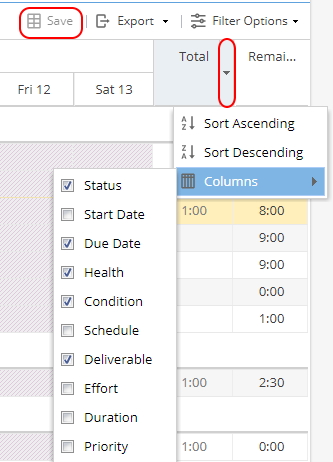
Remember after making any changes you will need to click Save if you want to keep these settings.
If a Column does not show in this list, it is mandatory and will always be included in your view.
The Remaining / Progress columns will be visible depending on the Progress Tracking Mode. -

View - The view button will appear greyed out unless a Project or Non Project Task has been selected. Clicking View will take you to the Task Overview screen.
Refresh - Refresh the page to check for any changes and see the data in real time
You can scroll through which week you are viewing using the Forward / Back arrow buttons or by using the Date Selector accessed by clicking on the date between these buttons.
Export - Export a copy of the Timesheet List for the week displayed in your preferred format (CSV, HTML or Excel)
Filter Options - Allows you to filter the view by Project or Task Status
Updating your Timesheet
-
Tasks assigned to you should already be visible in your Timesheet view.
(To add time for an Unscheduled Event or Admin Time you will need to add the rows first before you can log time)
To record times, follow these steps:- Double click on the box for the day in t he row you need to log time against.
- Enter time per day to reflect the time spent working on a Task.
You can enter time against any day up to the current date, future dates will show greyed out.
- Optional: Click on the speech bubble icon
 to e nter a description or internal comments
- Click OK
When entering time you may see a drop down arrow instead, this means you have to select a time type.
The options available are specific to your company but usually apply when different costs / rates need to be applied (e.g. Overtime or Non Billable ).- Click on the box for the day in the row you need to log time against, a drop down box will display.
- Double click in the hours box next to the time type(s) to enter time to reflect the time spent working on a Task.
You can enter time against any day up to the current date, future dates will show greyed out.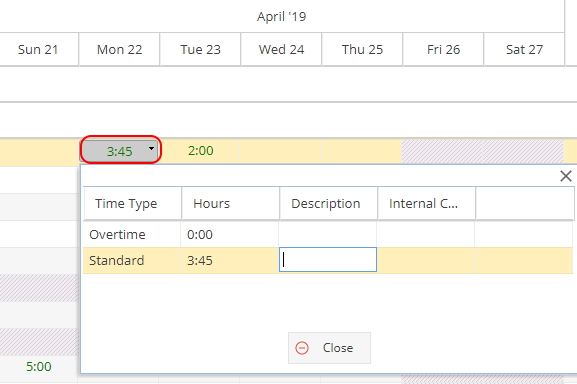
- Optional: Double Click in the description or internal comments box to add a note (This will only be editable if hours have been entered first)
- Click on Close
-
This will only apply if the Project (or Non Project Task) has the Tracking Type set to Remaining:

When you log time on your timesheet the time remaining (and the Progress %) will update automatically.
If the task is going to take more time than expected you can update the remaining column to give a more accurate indication of the time needed to complete the work.
If the task is going to take less time than expected, you can still complete the task without using all of the estimated number of hours. -
This will only apply if the Project (or Non Project Task) has the Tracking Type set to Percent:

Note: If you can not see the Progress column on your Timesheet, you do not have any Tasks configured this way - it is more common to only have the "Remaining" column available.
Hours can be logged in your timesheet but the Progress % will not update automatically.
Double click into the Progress box for the Task and update the %.
-
Condition is an indicator separate to health, to show how you feel the Task is going (The condition can be set for Tasks or Non-Project Tasks only).
Click on the Condition column next to the Task you want to update and you will have a drop down list showing the options: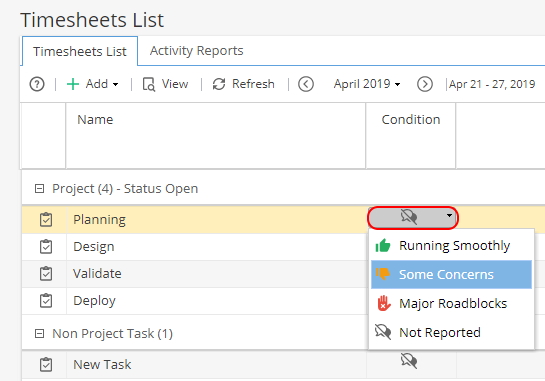
Add a comment and click OK.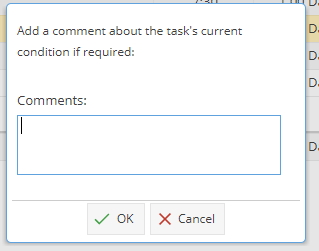
Remember when adding a comment this will be visible to other users who can see the Task or Updates.
Remember you can set your columns to hide / include Condition in your view. -
The status of a Task will automatically update from Planned
 to In Progress
  when time has been logged.
If you want to manually mark a Task as started, make sure you have the Status column included in your view. Click on the Calendar icon and select Start.
-
Before completing a Task, make sure the time has been logged.
If you have the Status column included in your view, click on the cog icon and then select Complete.
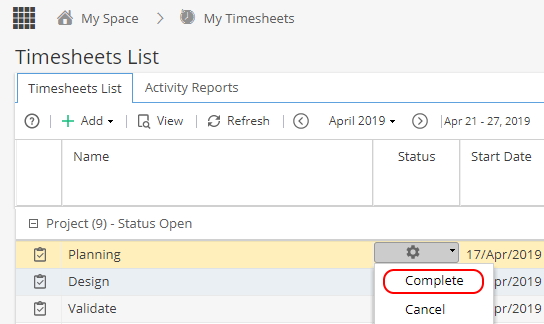
If you do not have the Status column you can mark a Task as complete from My Assignments or select a Task and click View, this will take you to the Task Details which will have a Complete button.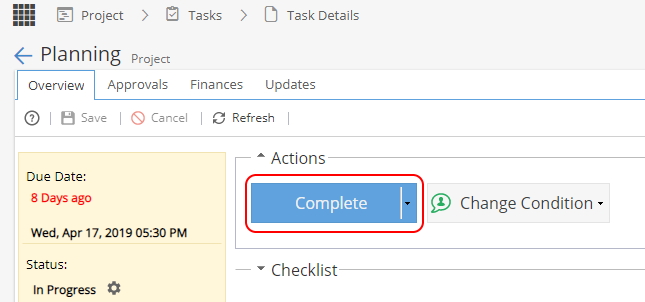
-
A milestone is shown with the green diamond icon.
Click on the calendar icon and select Start
Then click on the cog icon and select Complete
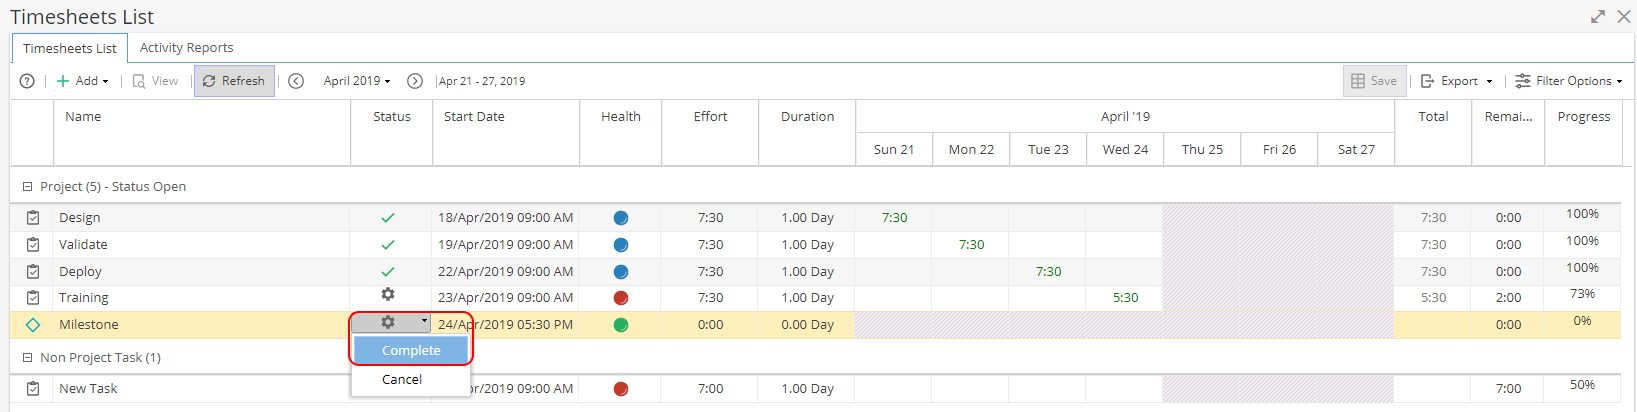
Note: You can not log time for Milestones so the dates will always appear greyed out and the progress can either be 0% or 100%.
Adding records to your Timesheet
-
Note: Tasks assigned to you which are not already completed should already show in your Timesheet list.
Click + Add and select the radio button for Project Related
Select the bottom drop down list to select Planned Assignments
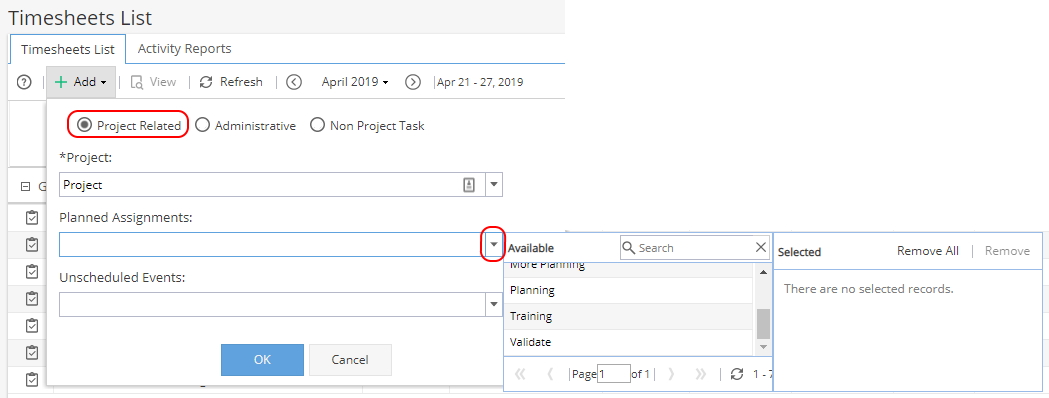
From the list of Available, double click one (or more) of the options.
Once the Tasks you need show in the Selected panel click OK.
Tasks will be shown in the group for the Project on your Timesheet.
Times can now be logged on the right hand side for each day.
Note: If a Project shows but you have no Planned Assignments to choose from check the Project - You may have been Granted Access to a Project rather than allocated to work on Tasks. -
A Task is a Scheduled Event which has been assigned / planned.
Unscheduled Events are used when you need to log time against a Project which was not part of the schedule.
This could be for additional meetings or travelling to client sites (the list of options available will be specific to your company).
Click + Add and select the radio button for Project Related
Select the bottom drop down list to select Unscheduled Event(s)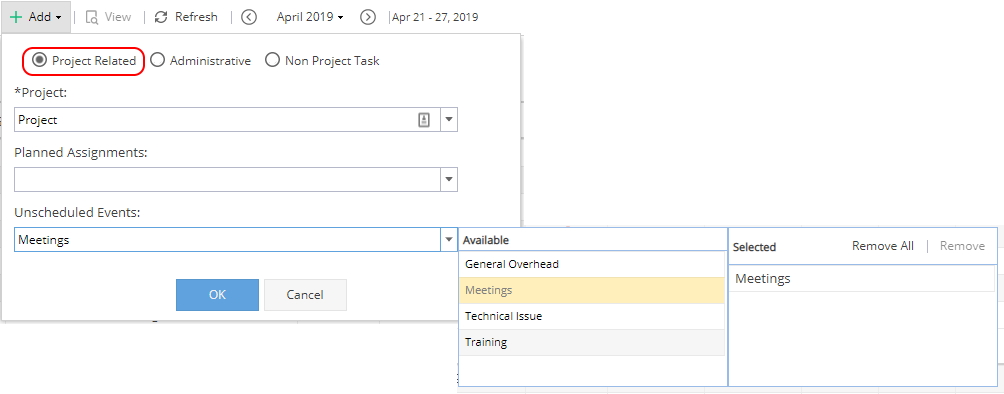
From the list of Available, double click one (or more) of the options.
Once the Unscheduled Events you need show in the Selected panel click OK.
From the Timesheet grouping for your selected Project extra rows will be added (at the bottom) with your Unscheduled Events showing so time can be added: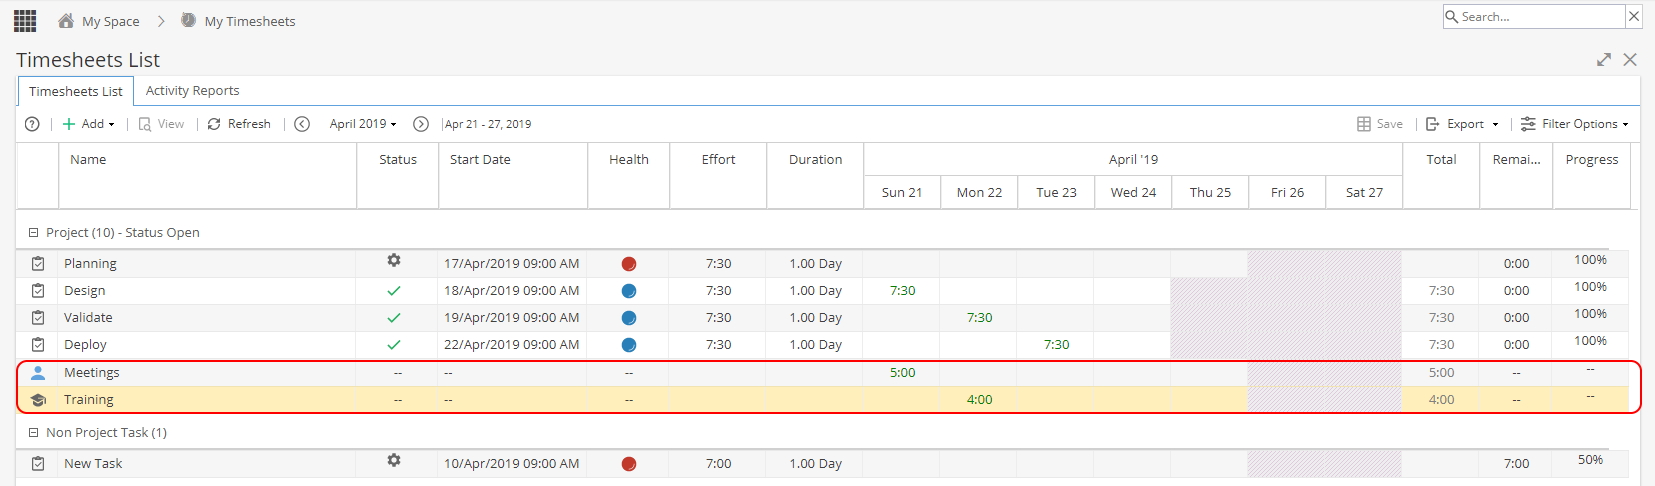
Note: If an Unscheduled Event is added but no time is logged, this row will disappear when you leave the screen or change the date range as it has not been used. -
The list of Admin Times will be specific to your company and not related to a Project, typically this may include annual leave, absences (such as sickness / jury duty) or training .
Click + Add and select the radio button for Administrative
When you click the drop down list you will have two panels.
From the list of Available, double click one (or more) of the options.
Once the Admin Times you need show in the Selected panel click OK.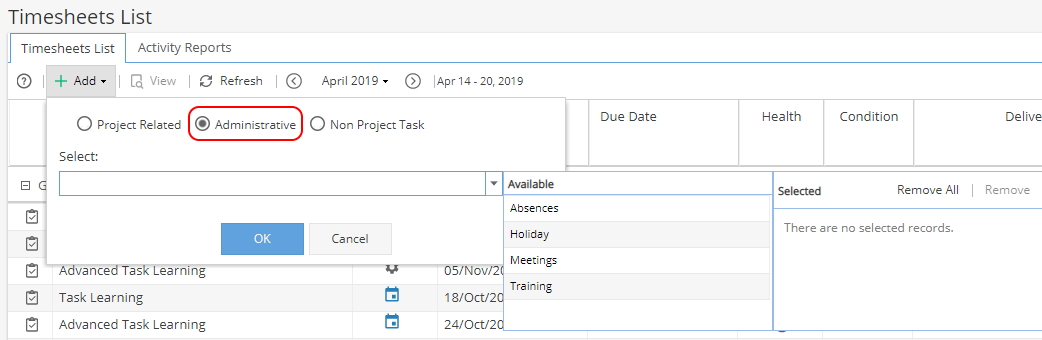
Administrative Times will be shown in the top group of your Timesheet.
Times can be logged on the right hand side for each day.
Note: If an Admin Time is added but no time is logged, this row will disappear when you leave the screen or change the date range as it has not been used. -
You would only use this option is if you have already been assigned to a Non Project Task but the time to be logged is for a date earlier than the Task Start Date.
If the Non Project Task is already visible in the bottom of your Timesheets List, you can add time / update the progress as normal.
Click + Add and select the radio button for Non Project Task.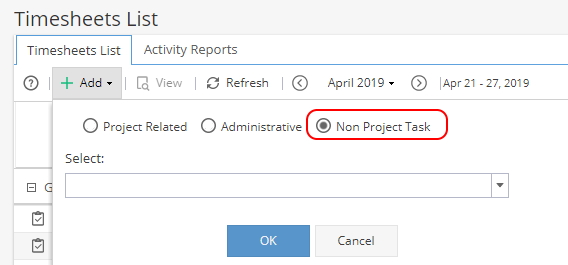
Select a Task from the drop down list and click OK.
You will find the Task you have added in the bottom grouping for Non Project Task, which will now allow for time to be added.
If no Tasks are available in the drop down list this means you do not have any Non Project Tasks assigned to you - read more about adding a non project task.
Additional Information
-
If you are assigned to a Task and someone else (e.g the Project Manager) changes this Progress % (via the slider from the Task Overview screen or the Gantt Progress column) this will add / remove records to your time logs.
 or
or 
For example, if a task is estimated to take 8 hours and is marked as 50% complete, this equates to 4 hours of work being completed.
The timesheet is updated to reflect this and cost/revenue amounts can be calculated.
Note: Any subsequent updates to the progress % will add extra time on to the original entry created.
Changes can be reviewed using the Task Updates tab, click on the Display filter on the top right and include Change Logs. -
Any time (including Admin Time such as annual leave) can only be added for current day / past dates via My Timesheets.
To add time off for future dates a user with access to Resources > Planning > Workload can do this on your behalf or updates can be received from another system (e.g. integration with a holiday system). -
If your company are using time log approvals and a timesheet entry is rejected, you will receive an email to let you know.
When you look at the timesheet you will see rejected time in red: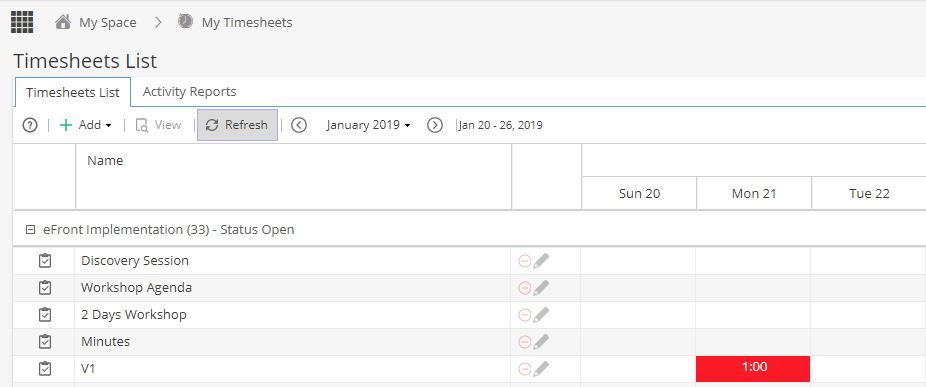
Click to view any comments: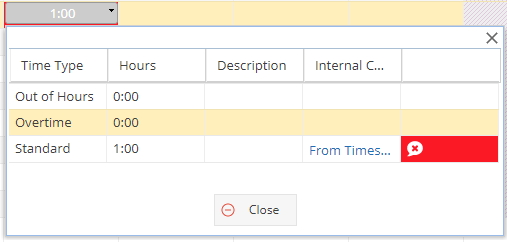
-
Time shown in Orange may have come from an Activity Report (you can check by hovering your mouse over the cell).
You will not be able to edit these entries from your Timesheet - if you update the Activity Report any amendments will show here (after using the Refresh button).
-
Hover your mouse over an Orange cell to check this entry has not come from an Activity Report.
If the message says "This time is not editable because there is more than one time log" click on View (button on top left).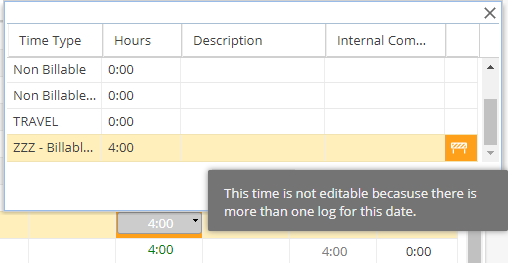
This will take you to the Project > Task > Overview screen.
Click on the stop watch icon and edit your time from here instead.
-
 If you have a Resource that needs to log time or work on Tasks you need to allocate them to the Project via Resources > Planning > Scheduling or make sure they are assigned to Tasks in the Schedule.
Granting Access is intended to allow for the Project to be viewed or Tasks to be approved rather than worked on. -
If a Task was marked as complete in error, it can be re-opened.
1) Find the Task in your list and click View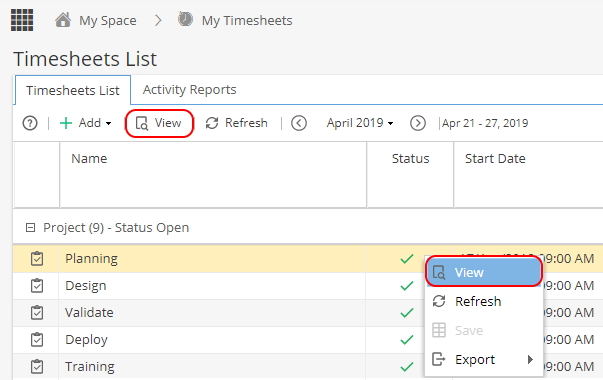
If the Task does not show, it may have been completed in a previous week, you can either scroll back through the weeks or click + Add, select Project Related and choose the Task again from the Planned Assignments list.
2) Click Re-Open from the Task Overview screen: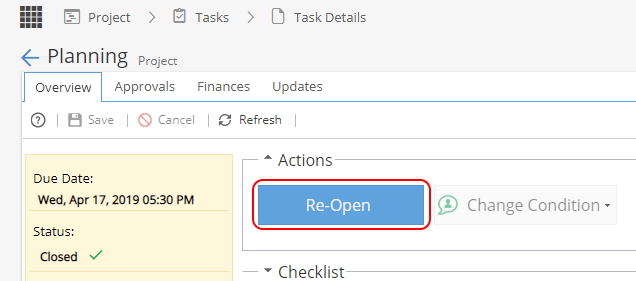
3) Go back to your Timesheets and click Refresh
If you have the Status column in your view, you will see the tick icon change to a cog
  to show the Task is In Progress.
 -
The timesheet view is there to show time logged, so even when a task has been completed this will continue to show if time was logged for the time period being viewed.
If you want to limit the tasks shown in your view, click on the Filter Options at the top right hand side of the screen.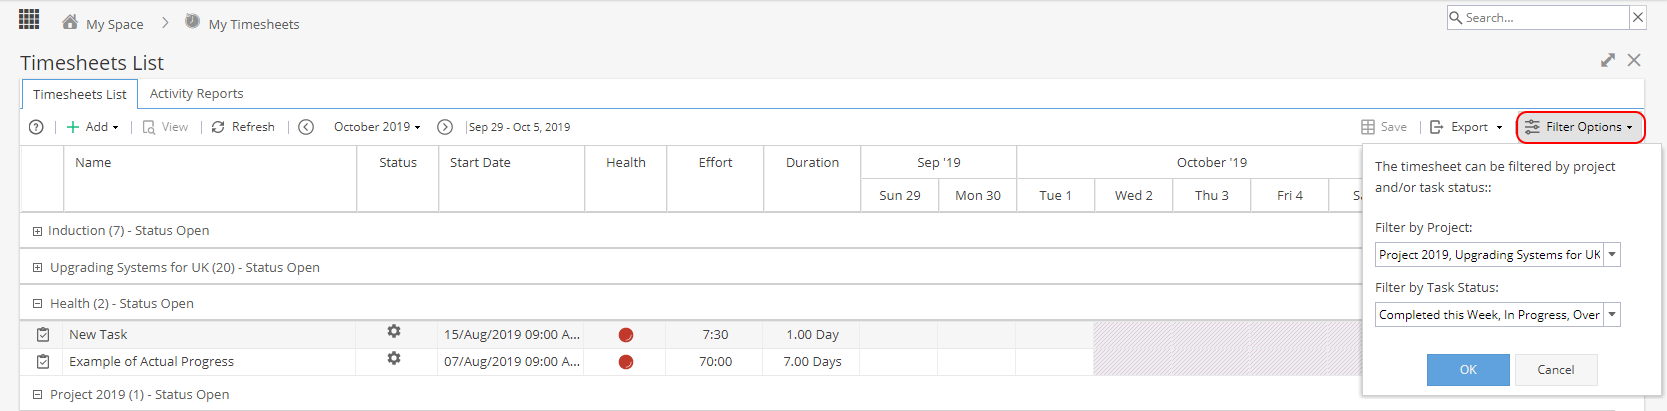
In the drop down option for Filter by Task Status you can select the Completed options and remove them from your view.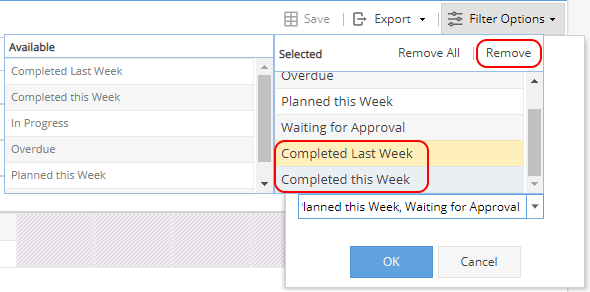
Note: The filters would need to be set each time you visit this screen as filter options can not currently be saved. -
If you can't see a Task you're expecting to have and you can't see it when clicking on + Add, Project Related and Project Assignments, check the Project.
Check to make sure the schedule is published.
Make sure you have been assigned to the Task.
Check the Task is not showing as Cancelled or Completed.
If you still can't see why the Task is not appearing for you, ask the Hydra Support team to take a look for you.