*Note: The Scheduling tab will not be visible if you are using Enable Simple Project Access.
If Simple Project Access is being used you will see a tab called "Access to Project" instead.
The Scheduling tab allows you to:
- View current allocations
- Schedule Resources to Projects, Admin Time (e.g Holidays) and Non-Project Tasks
- Review Utilization of Resources
Main Screen
The main area shows the resource on the left hand side and any projects they are assigned to are shown in the chart to the right of their names.
A project label shows within the chart between two dates - the projects start and end dates.

![]() Remember this view will only show you Internal Users.
Remember this view will only show you Internal Users.
If your company use Organizational Units, your view will be restricted so you can only see users with org units you have access to.
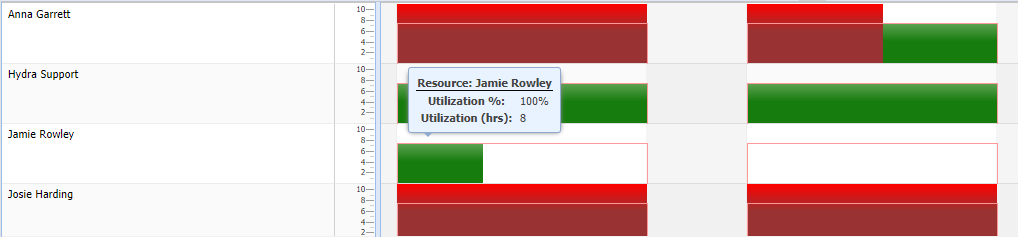
Hovering the mouse over any white space in the graph will display the date.
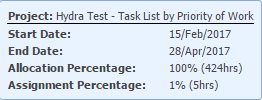
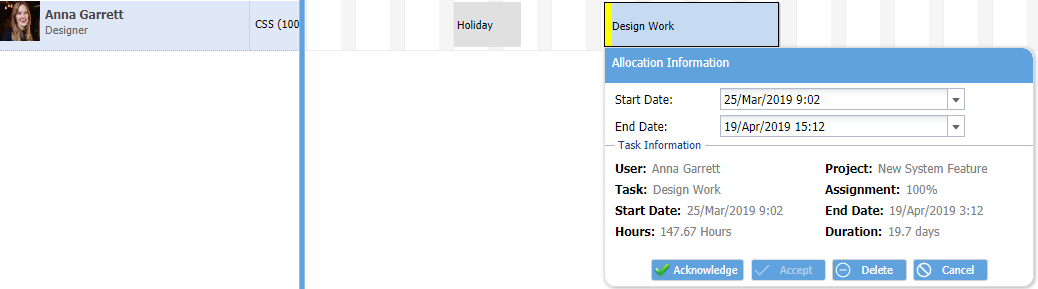
Hovering over a project will show you the following information:
- Project Name
- Start Date
- End Date
- Allocation Percentage
- Assignment Percentage
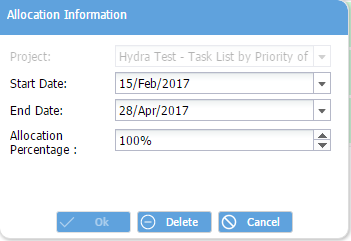
Double clicking on a project allows you to amend the following details or remove the allocation:
- Start date
- End date
- Allocation Percentage
-


Allocate

 Delete
Save Refresh
 View
View Cancel
-
Help: Brings you to this help article for support with Scheduling.
Allocate
Allocate: After a user has been selected you can allocate a Project, Non Project Task or Admin Time.
Remember to click Save after to confirm these changes.DeleteDelete: Select a Project / Admin Time or Non Project Task from the main Schedule view and click Delete to remove this from the Resource. Remember to click Save after to confirm these changes. ViewView: When a Resource is selected this button will take you to the Resource > Users > General Information tab.
SaveSave: Save any changes made. RefreshRefresh: Returns the screen to the last saved version. CancelCancel: Make sure any unsaved changes made are not saved.
-
-

Histogram
Full Screen Weeks
Weeks Zoom In
 Previous
 Months
 Zoom Out
 Next
Next-
HistogramHistogram: Toggle On / Off to see an additional graph at the bottom of the screen to show utilization.
Full ScreenFull Screen: Allows you to toggle the view of the Scheduling tab to see full screen
(without the menu / sub-menu bars showing).WeeksWeeks: Switch to a weekly view. MonthsMonths: Switch to a monthly view. Zoom
InZoom OutZoom In / Out: Change the level of detail in the view. This can be minutes, hours, days, weeks, months or years.
Previous
NextPrevious / Next: Jump backwards / forwards in time, the jumps will depend on the current view e.g weekly.
-
-

Select Date

Filter

Requests
-
Select Date
Select Date: Change the Scheduling view to include a specific date.
FilterFilter: Filter the list of users by Profile, Project, Organizational Units, Skills, Availability or Allocation.
Legend / Key: Explanation of the colour coding used on the Scheduling view.
RequestsRequests: Icon will only be visible if your Company is using Delegation.
Read more under Admin > Configuration > Company Preferences > Enable Task DelegationFilter: Search by Resource Name and select a user to show only their schedule.
You can use Ctrl + Click to select multiple users.
-
-
First select a Resource, click + Allocate and select the Project Allocation radio button.
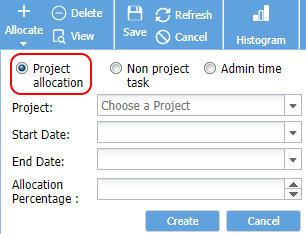
Choose the Project using the drop down or by typing the name or Alias.
Choose the Start Date, End Date and the Allocation Percentage of this persons time allocated to the project.
The Resource will now appear in Project > Project Home > Team tab and in the Gantt e.g. Resource Manager. -
First select a Resource, click + Allocate and select the Non Project Task radio button
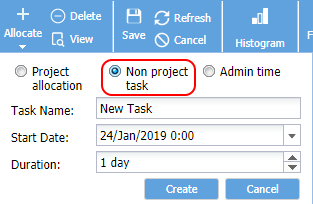
From here, provide a Name for the task, the Start date and the Duration.
Non Project Tasks can be seen in the scheduling view or via Operations > Tasks. -
First select a Resource, click + Allocate and select the Admin Time radio button.
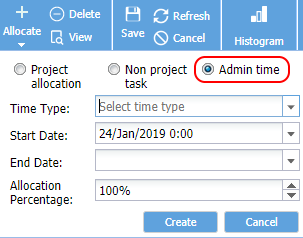
Choose a Time Type from the drop down list e.g Annual Leave
Update the Start Date, End Date and the Allocation Percentage.
The list of Time Types are defined under Admin > Configuration > Company Preferences > Time Types - Administrative -
Histogram - Click to toggle this view on/off.
The Histogram shows a graph below the main schedule view.
Resource names are shown on the left hand side, and next to these are vertical bars showing the utilization of that resource on a daily basis.
Hovering over any of these bars shows the Utilization as a percentage and the allocated Time for the resource on that day.
-
The Filter allows you to filter by Profile, Project, Availability or resources assigned to either a Project, Non Project Task or Admin Time.

-
This gives you a reminder of the colours used in the main Schedule view:
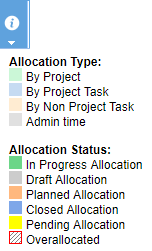
NB Over-allocated is only when there is a red outline.
You will often see a hatched area over all or part of a Project allocation (with no red outline).
This is a visual representation of how many hours have been assigned against the total hours allocated:
-
This menu option will only be visible if Admin > Configuration > Company Preferences > Enable Task Delegation has Enable Confirmation of Delegated Tasks set to Yes.
Click on Requests to filter the view to only see any Resources with pending delegation requests - clearly marked with a Yellow bar on the left hand side.
Double click on the Task to acknowledge (approve) or delete (reject).
-
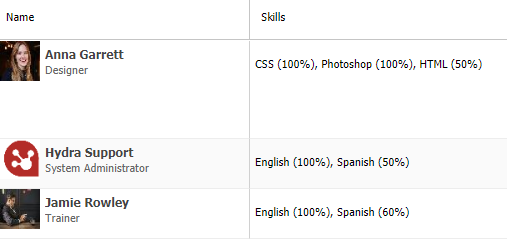
The Skills column will only be visible if Skills have been enabled via Admin > Configuration > Company Preferences > Activate Skills
Skills can be managed via Resources > Skills