Here you can configure the types of deliverables and relevant elements in the management of projects.
The deliverables allow you to represent the products or services that you provide as part of the scope of a project, standardize and control their execution.
-
A Deliverable is a product or service to be delivered at the end of a Project.
The Deliverable should contain everything required to meet the minimum requirements of the Project, in Hydra this can be set using a mixture of Activities and standalone Tasks. -
Go to Knowledge > Blueprints > select a Company Blueprint.
Click on the Assets tab and select Deliverables.
Press the New button.
A new deliverable will be created called "New Asset", edit the name and start configuring the Deliverable using the tabs on the right hand panel.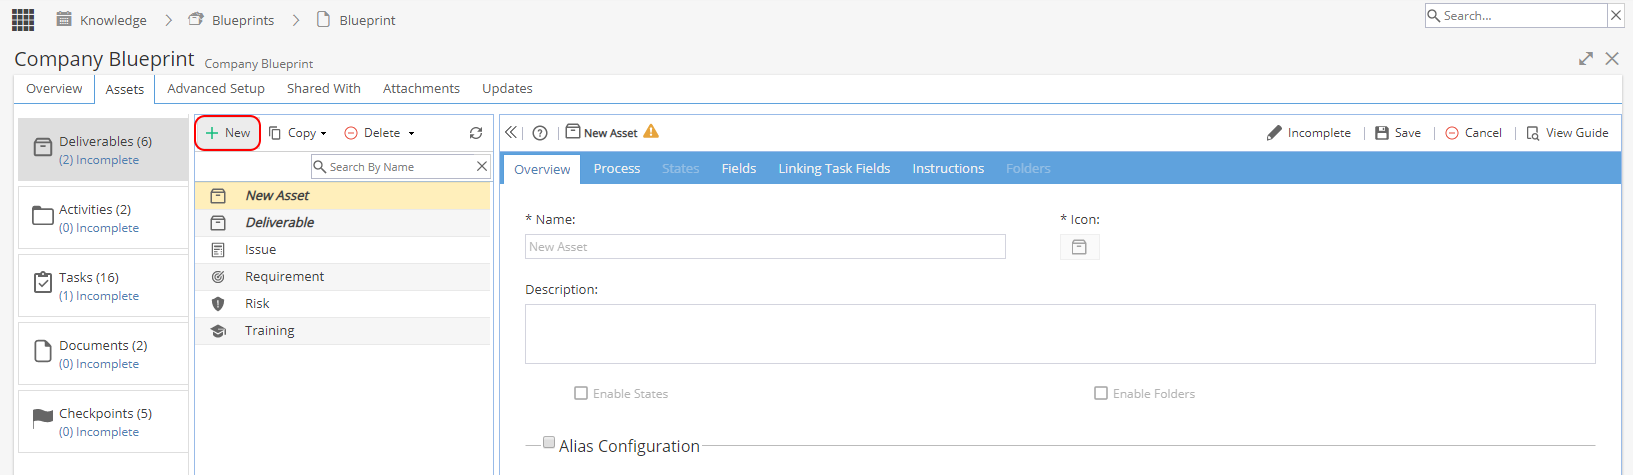
Remember to Save your changes. -
Go to Knowledge > Blueprints > select a Company Blueprint.
Click on the Assets tab and select Deliverables.
Select an existing Deliverable (the row will highlight yellow)
Press the Copy button.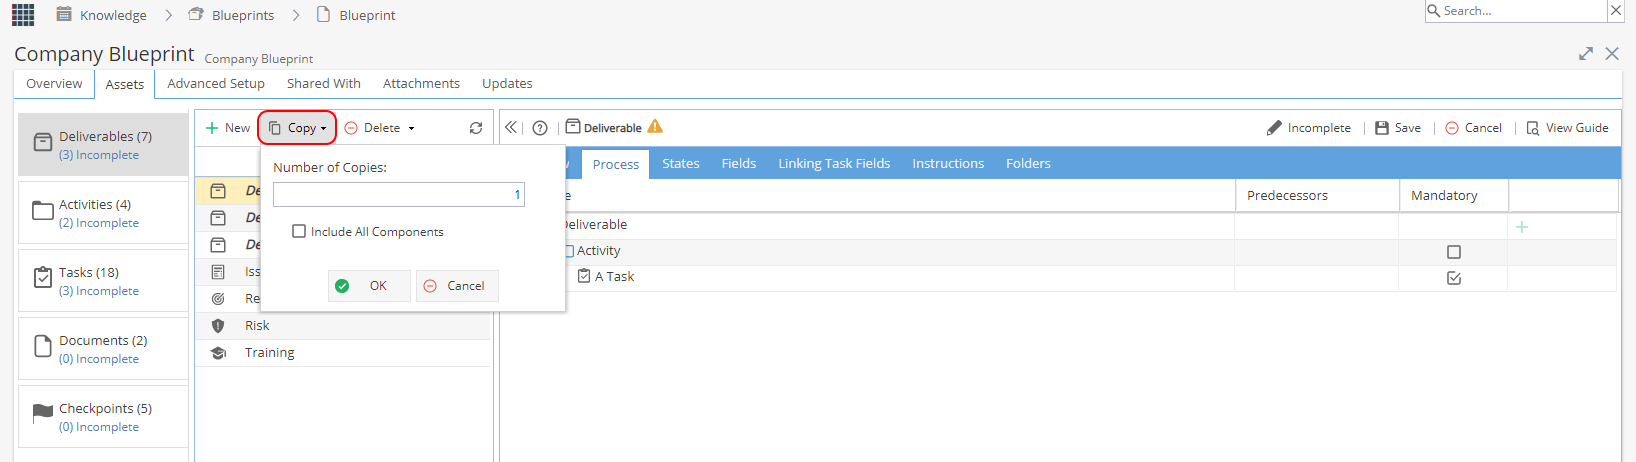
You can select the number of copies of the Deliverable you want to make, the default will be 1.
If you tick to "Include All Components" copies of the Activities & Tasks will be made with "Copy" at the end of the name (you will need to go through each Activity & Task to adjust the name / configuration and mark as complete before you can set the Deliverable to complete), if this option is left unticked the existing configuration will be used. -
Go to Knowledge > Blueprints > select a Company Blueprint.
Click on the Assets tab and select Deliverables.
Select an existing Deliverable (the row will highlight yellow)
Press the Delete button.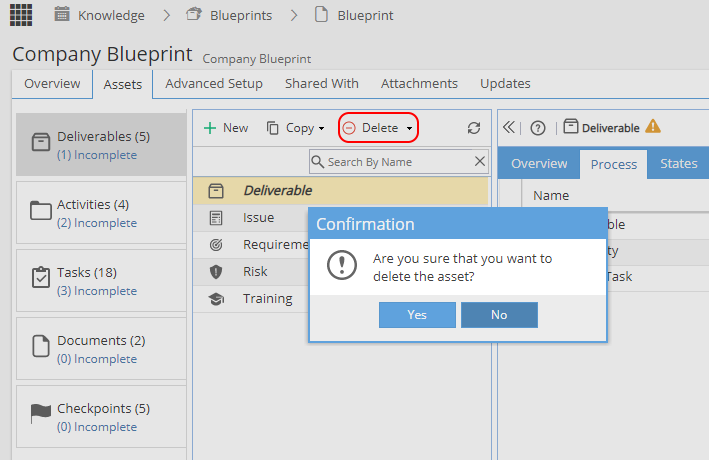
Remember when you delete a Deliverable, the Activities / Tasks will remain in the Blueprint.
Once a Deliverable is selected you will see 9 tabs on the right hand side, there is a summary below or you can click to expand a section to read about the tab in more detail.
Overview |
Process |
States |
Fields |
HTML Field |
Linking Task Fields |
Instructions |
Folders |
Visibility By Profile |
||||||||
| Name, icon & description. Options to set the use of States, Folders and Alias. | Defines the process of Activities / Tasks that must be followed to produce the deliverable. | Configure the names and triggers for the "States" of the deliverable, to make reporting easier. | Add Custom Fields to include additional information. |
A way to store additional information. | Associate custom fields from tasks so that they automatically pass to the deliverable when completed | Include information such as documents, pictures or videos to help the successful completion of a deliverable. | Define a folder structure to be created automatically if your deliverable will have lots of documents. | Specify if only certain profiles can see this Deliverable |
-
Go to Knowledge > Blueprints > select a Company Blueprint.
Click on the Assets tab and select Deliverables.
Select an existing Deliverable (the row will highlight yellow)
Click on the Overview tab
Double-click into a field on the form to go into edit mode (a pencil icon will show on the Assets tab and text will appear black instead of grey)From the Overview tab you can:
Change the name and description of the deliverable.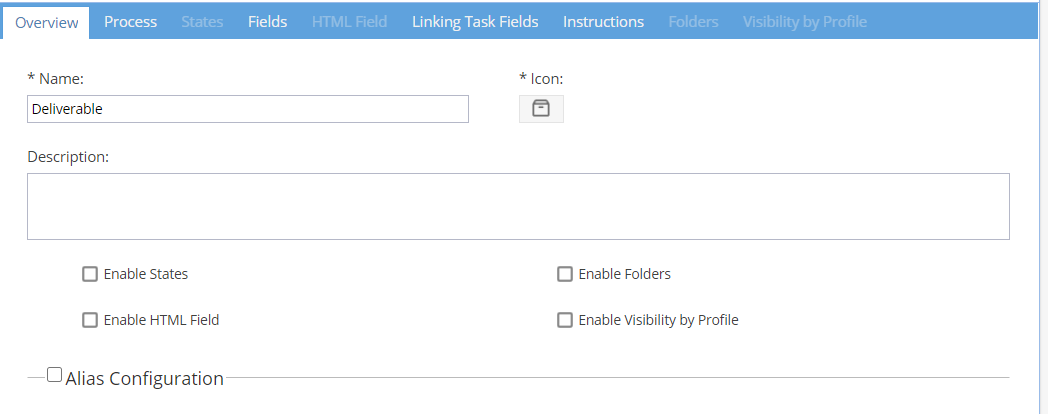
Select an icon with to identify the deliverable of this type in the projects
The icon selected will be visible:
Knowledge > Blueprints > Company Blueprint > Assets > Deliverables
Projects > Deliverables > Deliverables List
My Space > My Assignments > My Deliverables
Report Widgets e.g. Project Dashboard > Tabular View (where Item is set to Deliverables)
The four tick boxes to Enable... will make the corresponding tab available, allowing for further configuration.
You can read about the States, Folders, HTML Field and Visibility by Profile tabs below to learn more.
If you want the system to automatically generate an alias for this deliverable, tick to enable Alias Configuration.
Enter the prefix of the alias. For example, the alias prefix for Deliverables could be DEL.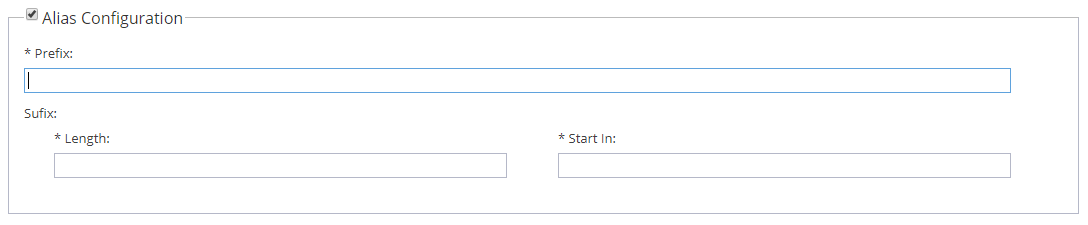
For the Suffix you need to set the length, e.g. if set to 3 this means that the alias suffix will go up to 999.
Note: This is per deliverable of this type, not per Project.
Start In is the next number to be used for the Suffix, this would usually be set to 0 (zero).
As the system generates the alias for each deliverable created this number will increase automatically.
Example of how Project > Schedule > Gantt shows with / without using the Alias option: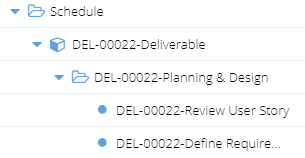
-
Here you can define the steps to be followed in order to achieve the deliverable.
This helps to ensure any Projects using this Blueprint will execute the deliverables in a standardized way.The process can be composed of:
 Activity Folders: Activities can represent stages or used simply to group tasks together.
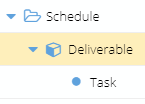
 Tasks: Represent work assignable to one or more people.
 Milestones: Shows important achievements within the deliverable process (read more here).
 It may be easier to create the Tasks and Activities first before you put a process together.
If you create Tasks and Activities here, you will need to go back and mark each individual item as Complete before they can be used in a Project.Set up a Process (Add Tasks & Activities)
Go to Knowledge > Blueprints > select a Company Blueprint.
Click on the Assets tab and select Deliverables.
Select an existing Deliverable (the row will highlight yellow)
Click on the Process tab.
Click on the Green + on the right hand side of the Deliverable Name.
A row will be added at the bottom of the process - you have 3 options:
- Start typing the name of the Activity or Task and any matching results will show (after at least 4 characters have been entered).
- Click on the magnifying glass to view a list of existing Tasks & Activities available to add.
- To create a new Task, simply type the Name and click Save (Remember you will need to go back to Assets > Tasks to configure the Task and mark as Complete).
Once you have 2 + rows in the Process of your Deliverable, you will see a green + when you hover your mouse over the rows.
Clicking on the Green + (for any row other than row 1) gives you several options: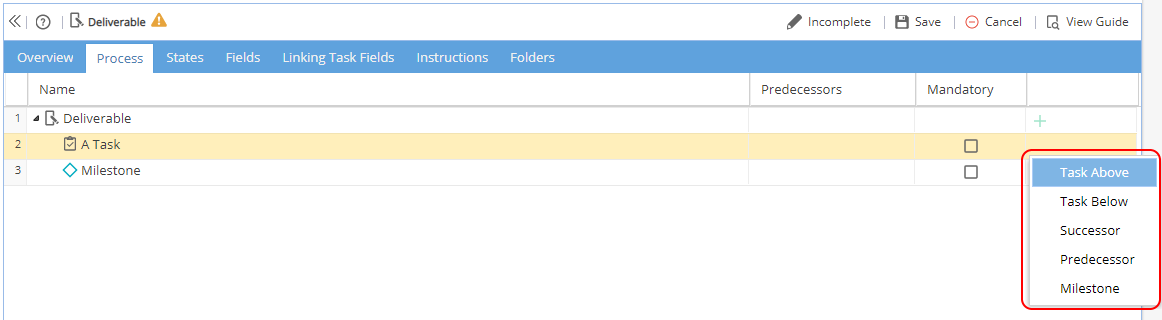
Task Above: Add a task above the item you selected (at the same level).
Task Below: Add a task below the item you selected (at the same level).
Subtask: Adds a child task below the item you selected.
This option is displayed when the selected item is an Activity folder or newly created Task - if used against a Task, this will be converted into an Activity Folder.
Successor: Add a task below the item you selected (at the same level) and marks it as the successor of the selected row.
Predecessor: Add a task above the item you selected (at the same level) and marks it as the predecessor of the selected row.
Milestone: Add a milestone under the selected item.
Predecessors
Double click into the cell and type the row number of the preceding Task (if applicable).
You can only use Tasks, not Activity folders, as Predecessors.
If the task has multiple predecessors, you can add them by separating them with a semicolon ;
Example: 3; 8
Dependency Relationships
By default, the system creates dependencies as Finish-Start, but you can modify it using these acronyms:
SS: Start - Start
SF: Start - Finish
FS: Finish - Start
FF: Finish – Finish
Example: 5SS
Lag / Lead Times
Lag time causes a gap in timing, which delays the start of the successor task.
You can set Lag by adding a + sign and the number of days after the predecessor
Example: 5+3 means that row 5 is the predecessor task and once completed there will be a delay of 3 days before this task can begin.
Lead time is overlap between tasks that have a dependency, where the successor task can begin before the predecessor has been completed (this can only happen for tasks with a Finish - Start relationship).
Example: 3-1 means that the task starts 1 day before the task in row 3 is due to be completed.
Mandatory
By marking a Task as mandatory, the system will allow a Task to bypassed but it will warn the user and can also be set to flag up an Alert.
If a Task marked as Mandatory is not relevant to a Project, a conversation with the Project Manager should occur to discuss why, as the Blueprint may need to be updated.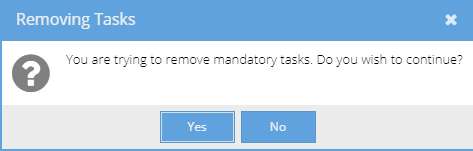
Note: A Task will only show marked as Mandatory once the Project is Live, the Schedule is Published and a Resource is Assigned.Changing the order of Activity Folders / Tasks
Click and drag a selected row (the row will highlight yellow) to change the order of the process.
(A green tick will show if the move is allowed, or a red no entry sign if the move is not possible).
Click on Save on the top right.Removing Activity Folders / Tasks from the Process
Hover your mouse over the row you want to remove and the red delete icon will appear on the right hand side.
If you remove an Activity Folder, any Tasks linked to the folder will also be removed from the process tab.
Click on Save on the top right.
Save / Complete after making changesRemember if you delete a Task / Activity from the Process screen, they will still remain in the Blueprint under Assets > Tasks or Assets > Activities.
After making any changes to the Deliverable, remember to Save and mark the Deliverable as Complete. If you get an error check if Activities / Tasks are showing as Incomplete.
-
Using States can be helpful to provide a summary of where your Deliverables are in the process which is clear and easy to understand.
For example, if someone asked how are the new websites coming along?
Instead of running through the progress % for each one you could say, "It's going well, we have 2 in design, 2 in development, 1 in testing and 1 has been completed", giving a better indication of how things stand.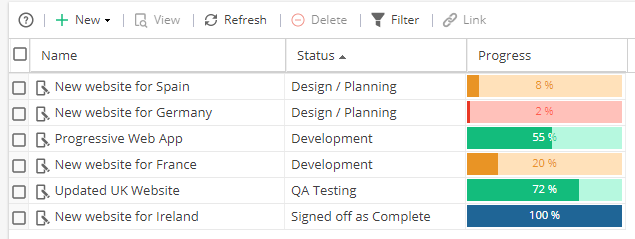
Go to Knowledge > Blueprints > select a Company Blueprint.
Click on the Assets tab and select Deliverables.
Select an existing Deliverable (the row will highlight yellow)
Click on the States tab
If the States tab shows greyed out, go to the Overview tab and double click so you can tick Enable States and then Save and the tab will become available.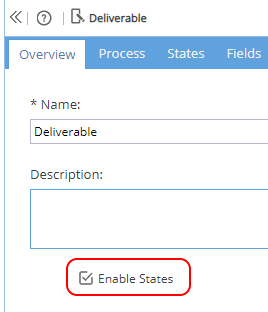
The States tab has 3 columns:
Name - Name of the States to be used for reporting
Default - Only one checkbox can be ticked.
Change Automatically When This Task is Closed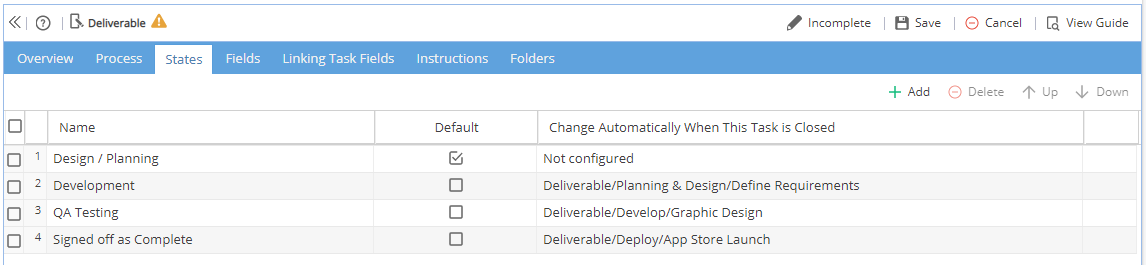
To add a State, click the + Add button and change the name of the State.
One State can be marked as the Default - For the Default leave the Task as Not Configured.
Double click in the "Change Automatically..." column and use the drop down to select a Task if you want the State to be updated automatically once closed.
To change the order of the list of States shown from the Project > Deliverables > Overview screen when using the Change Status button select a State and use the Up / Down buttons on the top right.
Remember to click Save after making any changes and make sure the Deliverable is marked as Complete.
To remove a State, select a row (this will highlight yellow) and use the red delete icon from the toolbar or at the end of the row.
When you are happy with the setup click Save (and Complete if no further configuration needed)States will change automatically if the configured Task is closed but States can be selected manually at any time from the Project > Deliverables > Overview -
This tab is to add Custom Fields to include additional information on Deliverables.
Before a field can be added, it must be configured from Knowledge > Blueprints > Advanced Setup > Fields (where the Type is Deliverable).
Go to Knowledge > Blueprints > select a Company Blueprint.
Click on the Assets tab and select Deliverables.
Select an existing Deliverable (the row will highlight yellow)
Click on the Fields tab
Click Add and select one or more Custom Fields from the list and click OK.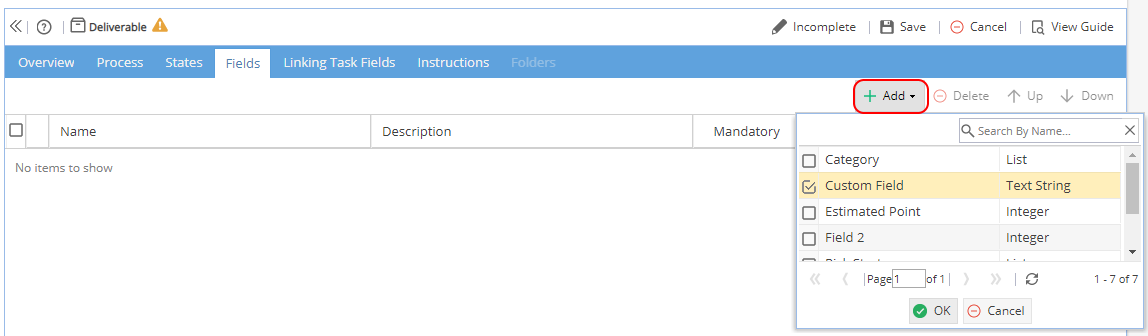
Update the tick boxes to mark the field as Mandatory / Visible.
Once added the fields can be ordered using the Up and Down arrow buttons.
When you are happy with the setup click Save (and Complete if no further configuration needed)
If a red triangle shows or the Name, Description or Type needs to be updated the changes must be made from Knowledge > Blueprints > Advanced Setup > Fields.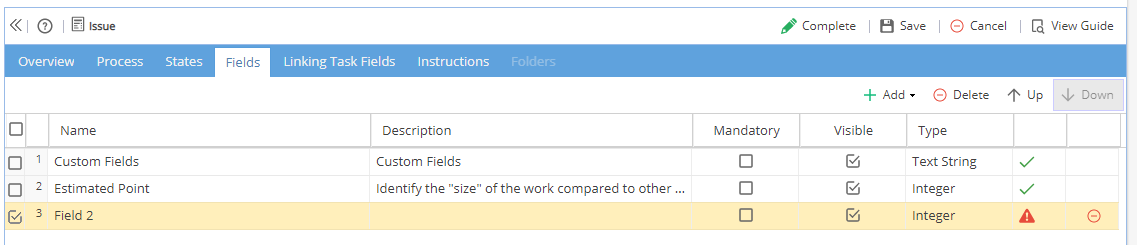
When you add a Custom Field to a Deliverable it will be visible in a Project from the Project > Deliverables > Overview screen in the Form section.
If you need to remove a Field, use the Delete icon.
You will see a pop up box to confirm you want to go ahead: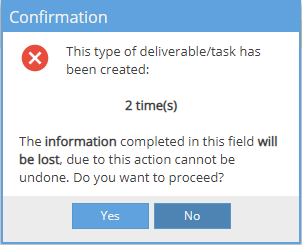
-
Clients in the UK would typically use Custom Fields, this feature was developed for a Client who needed to store a large amount of information per Deliverable.
Custom Fields are preferred as they are searchable, the HTML field can be used for storing data for information only. -
Linking Task Fields can only be used if you have added Custom Fields to the Fields tab on both the Deliverable and the Task, with the same Type and settings for both.
Linked Fields will also be shown on the Guide (from Project > Deliverables > Overview)
Setting this up can save time by automatically copying details from a Task to a Deliverable, without the need to manually enter details in two different screens.
If custom fields have not been configured you will see a message saying "No items to show"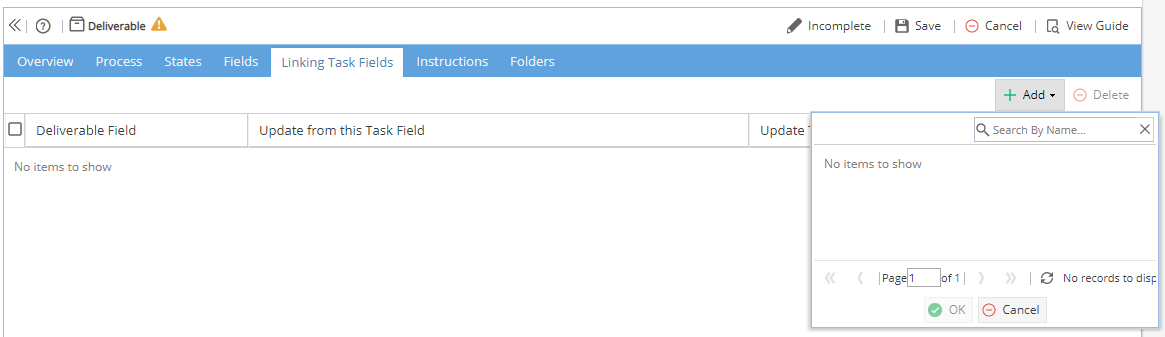
If you see a red warning triangle in the Match column, it means there is a mis-match between the Deliverable custom field and the Task custom field.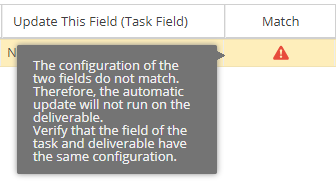
To resolve this error, review Knowledge > Blueprints > Advanced Setup > Fields for both the Task and Deliverable.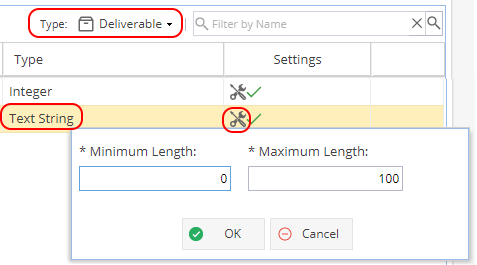
Make sure the Type matches.
Also click on the spanner icon to check the settings match too.
For example if both custom fields are text strings but the Task allows 200 characters and the Deliverable only has 100 characters, the custom field can not be shared.
If a change occurs where this rule can no longer work (e.g. a Task is deleted) you may see a message asking you to update the links:
Once set up, whenever a Task Custom Field is updated and saved (from the Form section on Project > Tasks Details > Overview) this will update the linked field on the form section for the Deliverable Custom Field (Project > Deliverables > Overview) -
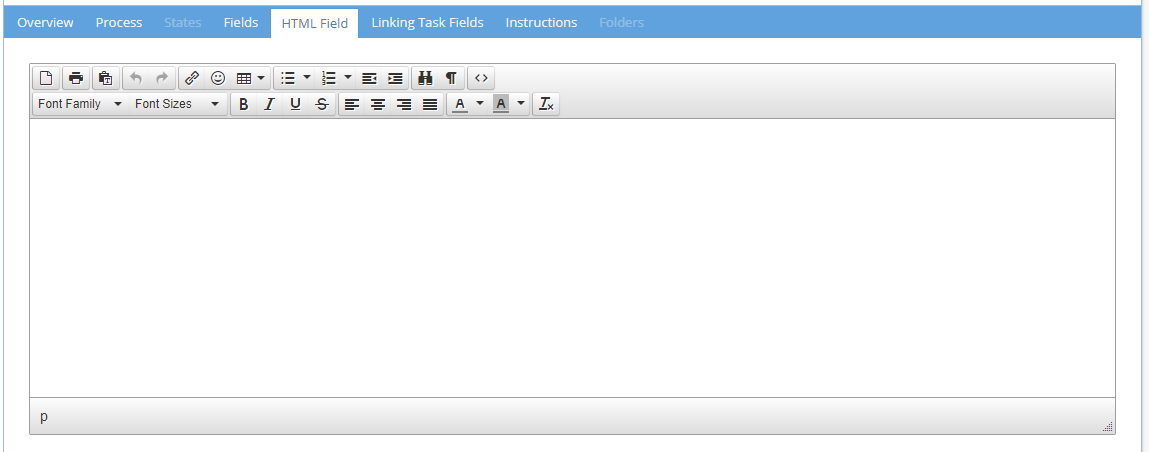
Here you can provide more information about the Deliverable.
Once Link Documents has been ticked you will have the option to:
The Instructions tab is split into two parts Documents and Instructions , you can use one or both options.
Go to Knowledge > Blueprints > select a Company Blueprint.
Click on the Assets tab and select Deliverables.
Select an existing Deliverable (the row will highlight yellow)
Click on the Instructions tab
- Upload a file
- Provide a URL link
- Link to an existing document relating to this Blueprint.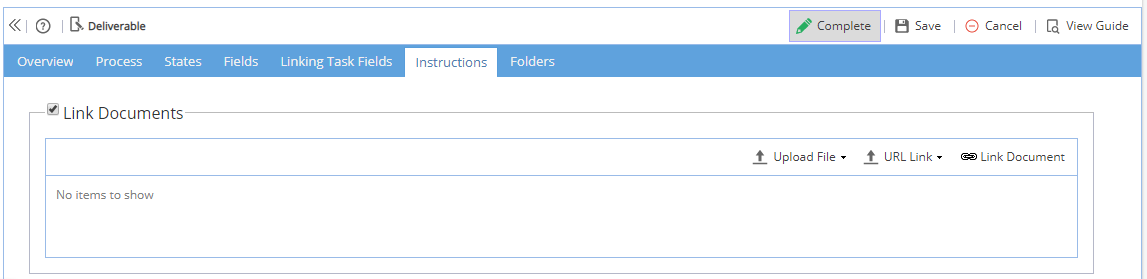
Once a Document has been added (and Saved) you will see the options to View or Delete.
Once Add Instructions has been ticked you will have a text box to add more information.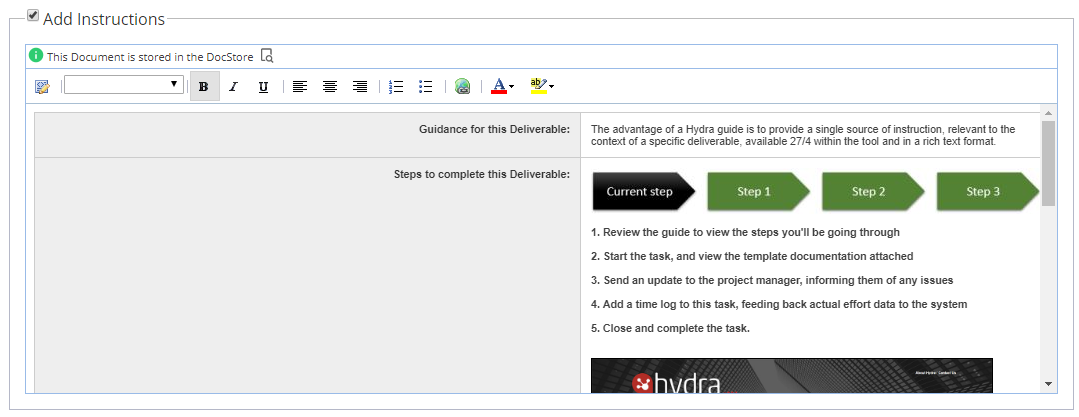
You can preview how the instructions will look at any time using the "View Guide" button on the top right.
The guide will be visible from Project > Deliverables > Overview:

-
Folders are useful if a Deliverable will have lots of Documents, to give you structure to the way they are organised .
Go to Knowledge > Blueprints > select a Company Blueprint.
Click on the Assets tab and select Deliverables.
Select an existing Deliverable (the row will highlight yellow)
Click on the Folders tab
If the Folders tab shows greyed out, go to the Overview tab and double click so you can tick Enable Folders and then Save and the tab will become available.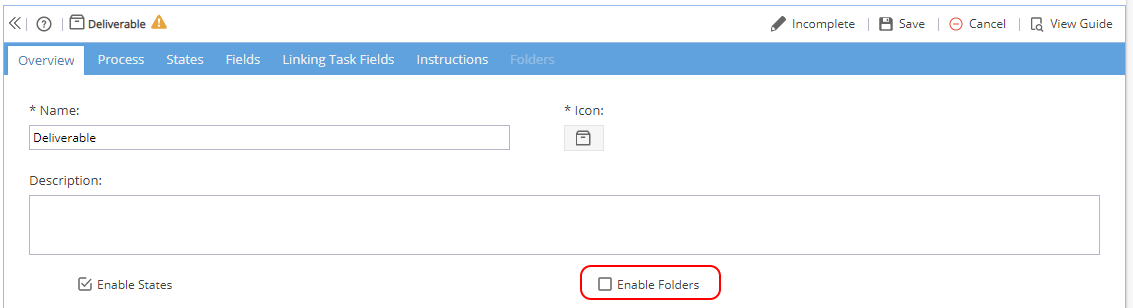
Once the tab is available you can add/remove Folders, or create sub-folders, using the Green Plus / Red Delete icons on the right hand side.
Remember to Save after making any changes (and make sure the Deliverable is marked as Complete to use)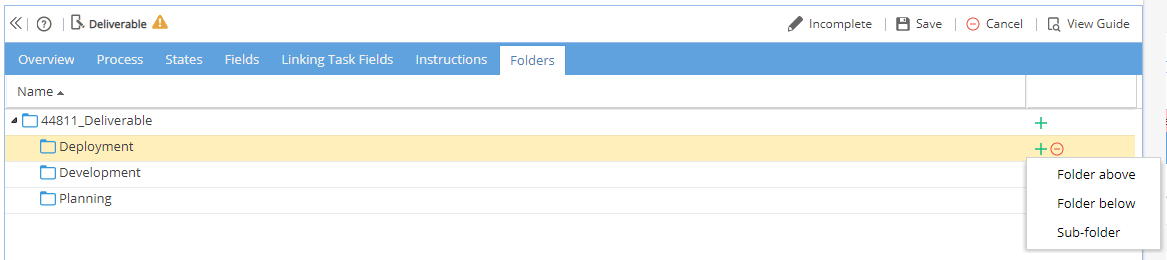
When a Deliverable is created in a Project using this Blueprint the folder structure will automatically be created within the Documents > Project Library: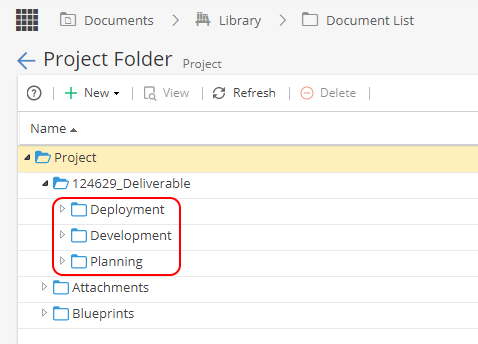
-
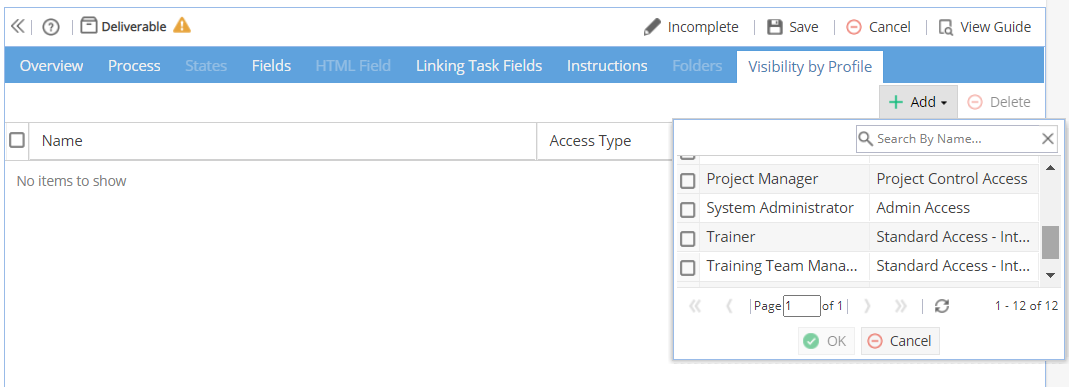
This setting allows you to restrict who can view this type of Deliverable based on a user's profile.
Note: If you decide to use this option, remember future changes (such as creating a new profile for your company users) may require you to go back over your blueprints to update these settings.
Go to Knowledge > Blueprints > select a Company Blueprint.
Click on the Assets tab and select Deliverables.
Select an existing Deliverable (the row will highlight yellow)
Click on the Visibility by Profile tab
If the Visibility by Profile tab shows greyed out, go to the Overview tab and double click so you can tick Enable Visibility by Profile and then Save and the tab will become available.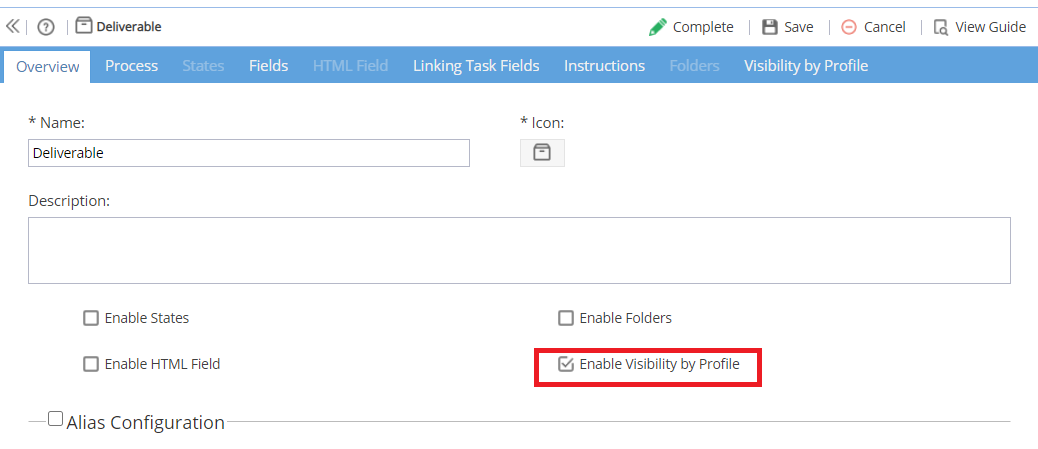
Once the tab is available you can Add / Remove Profiles to the list using the Green Plus / Red Delete icons on the right hand side.
Remember to Save after making any changes (and make sure the Deliverable is marked as Complete to use)